Desplegar Django en AWS EC2
En resumen
La infraestructura del proyecto se implementa mediante AWS Academy, utilizando una instancia EC2 como servidor. Sobre esta se configuran Nginx, Gunicorn y MySQL, junto con el entorno de Django y sus dependencias necesarias para ejecutar la aplicación.
1. Abrir la consola de AWS
Desde el portal de AWS Academy iniciamos el AWS Learner Lab para habilitar la consola.
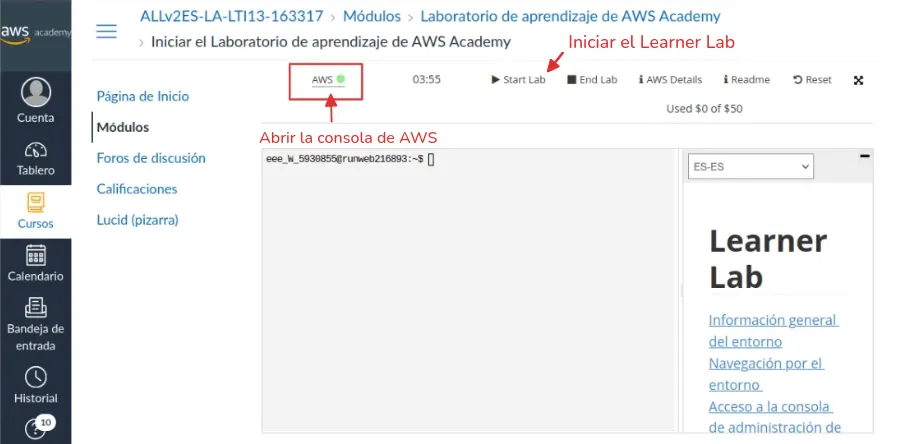
Figura 1. Iniciar el laboratorio y abrir la consola
Info
Cuando el indicador se muestre en color verde, hacemos clic en AWS para abrir la consola.
2. Acceder al servicio EC2
Una vez dentro de la consola, se busca EC2 en el buscador superior y se selecciona el servicio Amazon EC2 para ingresar a su panel de administración.
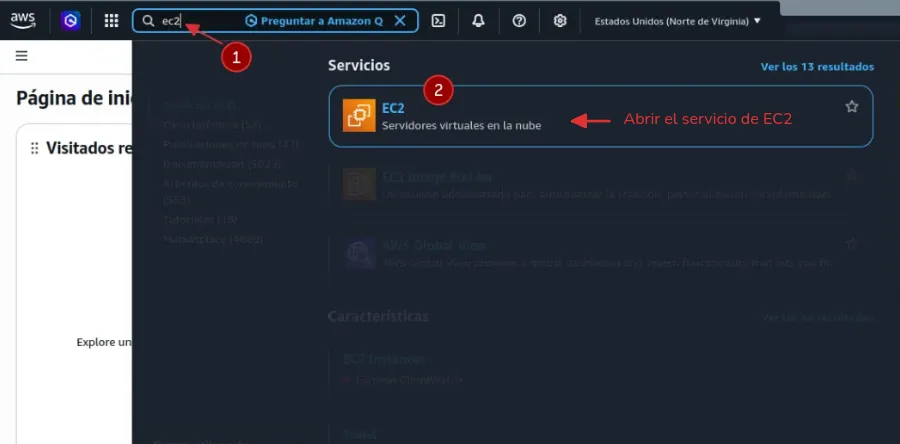
Figura 2. Seleccionar el servicio de EC2
Se abrirá el panel principal de Amazon EC2, desde donde se pueden crear, administrar y monitorear las instancias.
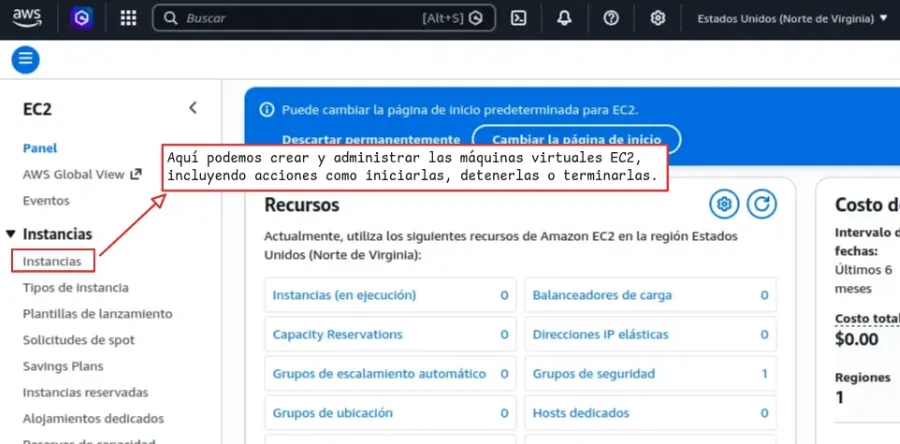
Figura 3. Panel principal de EC2
3. Lanzar nueva instancia para configurar
Dentro del panel de EC2 nos desplazamos hasta encontrar el botón y hacemos clic en:
Para iniciar la configuración.
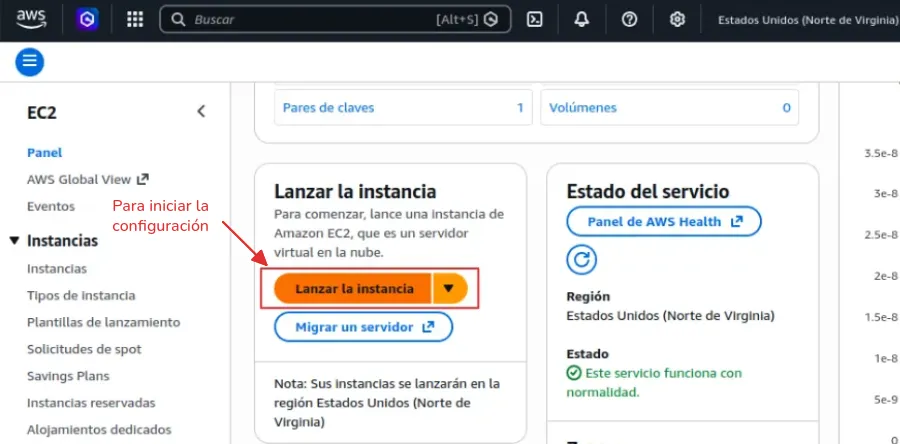
Figura 4. Lanzar una nueva instancia EC2
4. Configurar el nombre
El nombre es simplemente una etiqueta para identificar esta instancia dentro de AWS.
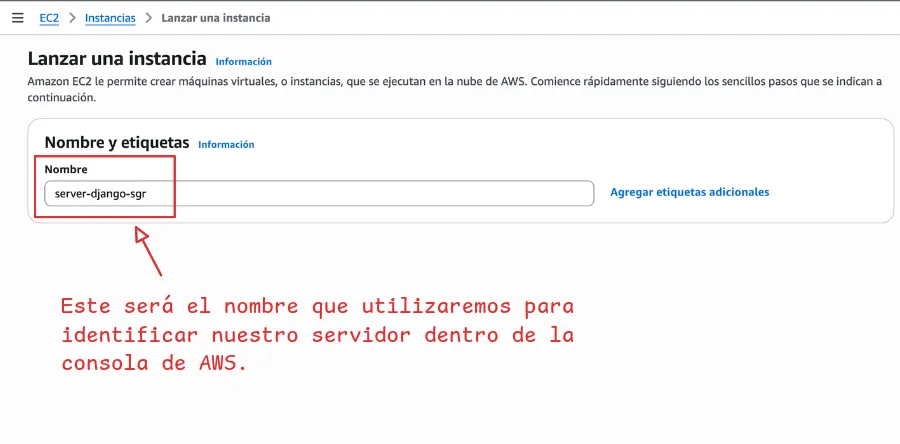
Figura 5. Definir el nombre o etiqueta de la instancia
5. Seleccionar AMI compatible
Seleccionar una AMI ( Amazon Machine Image ), que es la plantilla del sistema operativo que se instalará.
Una opción muy cómoda es Ubuntu Server, porque es fácil de administrar, es ligero, estable y ampliamente utilizado en servidores.
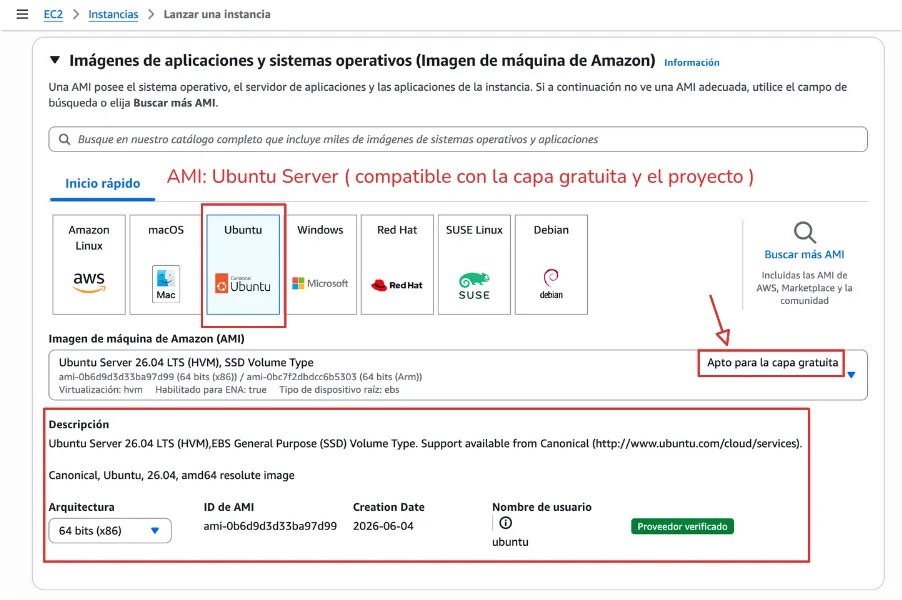
Figura 6. Seleccionar AMI Ubuntu Server
6. Seleccionar tipo de instancia
El tipo de instancia determina los recursos asignados al servidor, como la CPU y la memoria RAM.
En este caso, seleccionaremos t3.micro, ya que se encuentra dentro de la capa gratuita y proporciona los recursos necesarios para ejecutar nuestro servidor sin utilizar una configuración de mayor capacidad y mal utilizar los créditos de la cuenta.
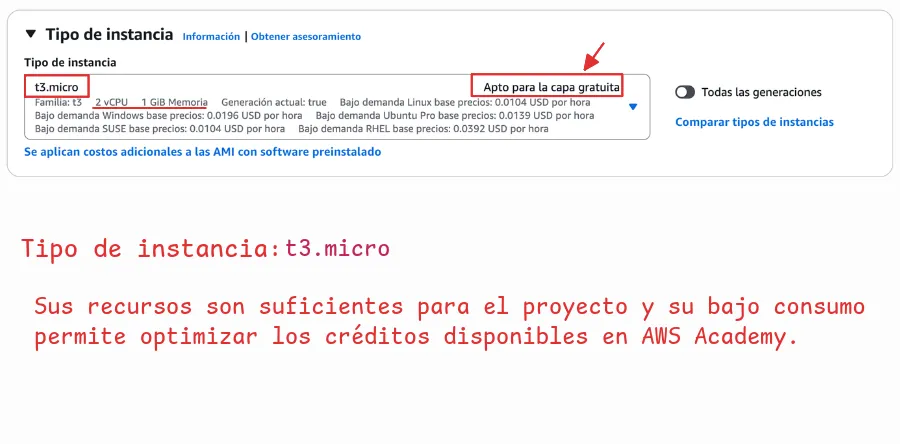
Figura 7. Seleccionar tipo de instancia t3.micro
Cuidado con seleccionar otros tipos
Elegir otro tipo de instancia, podría consumir los créditos del laboratorio más rápidamente o incluso no estar permitido por las restricciones del entorno.
7. Crear par de claves (para conectarse)
El par de claves permite autenticarnos de forma segura al conectarnos a la instancia EC2 mediante SSH. Está compuesto por una clave pública, que se almacena en la instancia, y una clave privada, que debemos descargar y conservar en un lugar seguro. Esta última es necesaria para establecer la conexión, por lo que si se pierde, no podremos utilizarla para autenticarnos nuevamente.
Seleccionaremos Crear un nuevo par de claves y configuraremos:
- Nombre del par de claves: un nombre descriptivo para identificarlo.
- Tipo de clave:
RSA, compatible con instancias Linux y Windows. - Formato del archivo:
PEM, para utilizarlo mediante SSH.
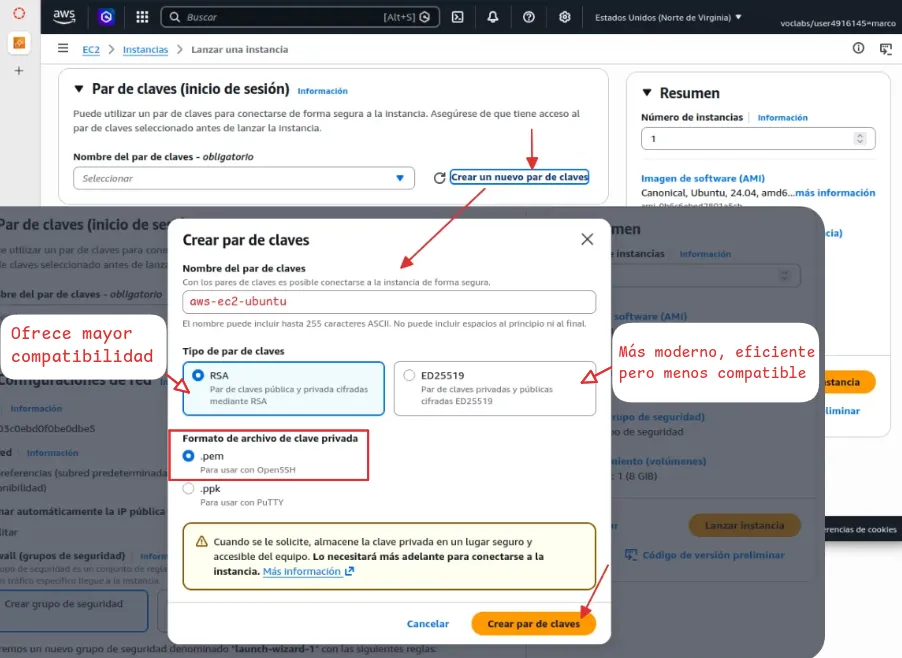
Figura 8. Crear par de claves para conectarse por ssh
Al seleccionar Crear par de claves, la clave privada se descargará automáticamente como un archivo .pem.
AWS no permite descargar nuevamente la clave
Debemos guardarla en un lugar seguro, ya que AWS no conserva una copia de esta clave y no será posible descargarla nuevamente desde la consola.
Es recomendable moverla al directorio ~/.ssh/, destinado al almacenamiento de claves y archivos de configuración utilizados por SSH.
mv nombre-clave.pem ~/.ssh/
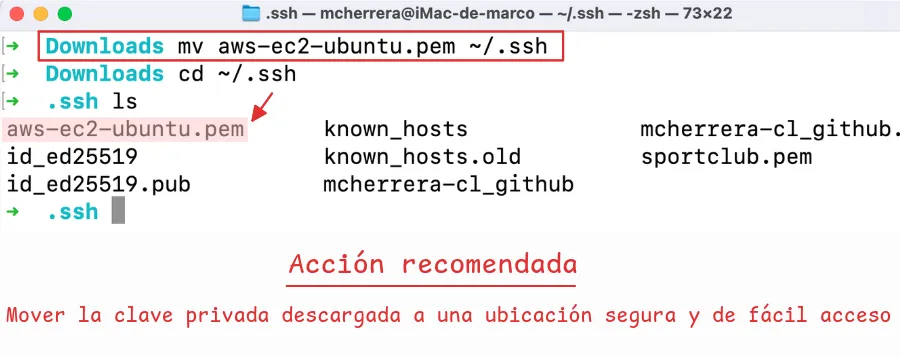
Figura 9. Mover clave privada a otro destino
8. Configuración de red y acceso
AWS utiliza los grupos de seguridad (security groups) para controlar el tráfico de red hacia la instancia.
Las configuraciones más comunes son:
- SSH ( puerto 22 ): para conectarte al servidor
- HTTP ( puerto 80 ): para servidores web
- HTTPS ( puerto 443 ): para tráfico seguro
Para nuestro caso, desplegando Django en una EC2, tiene sentido habilitar las tres reglas de entrada.
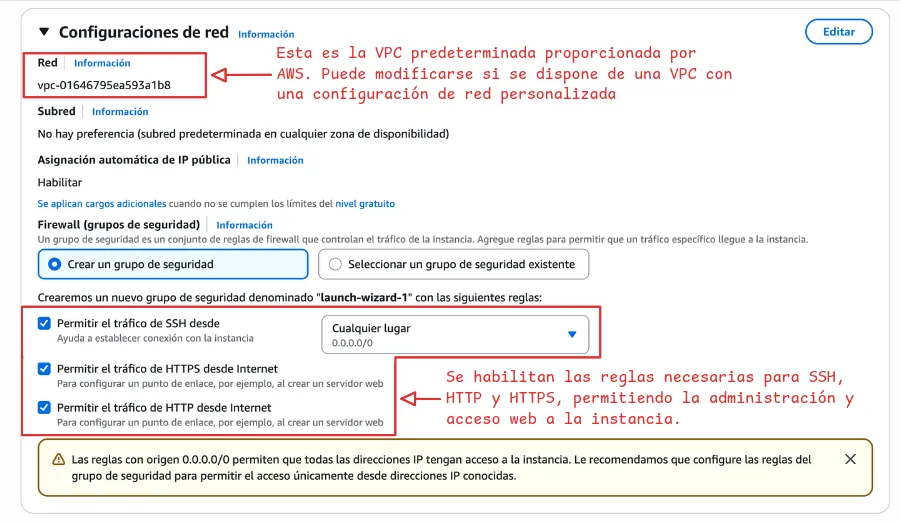
Figura 10. Configuración de red y reglas de acceso
9. Lanzar instancia
Finalmente, se deja el almacenamiento con los parámetros básicos y se hace clic en:
El proceso suele tardar menos de un minuto.
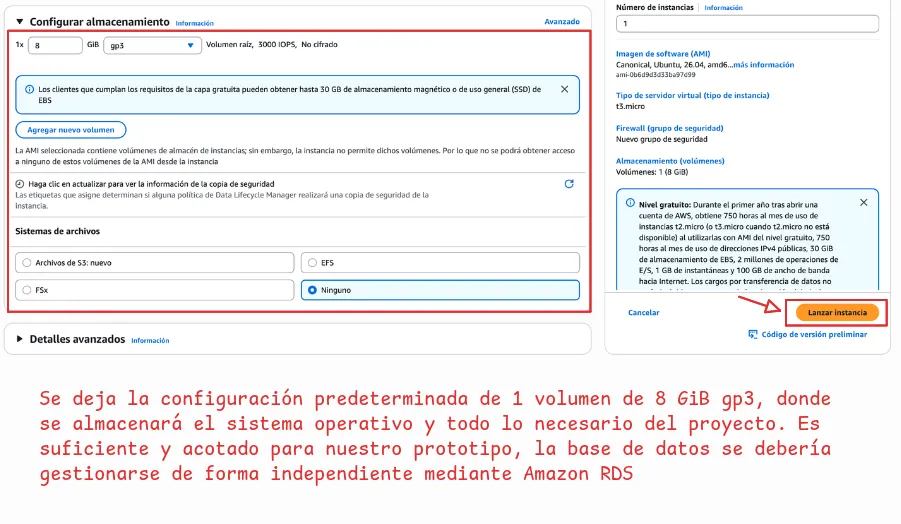
Figura 11. Lanzar instancia
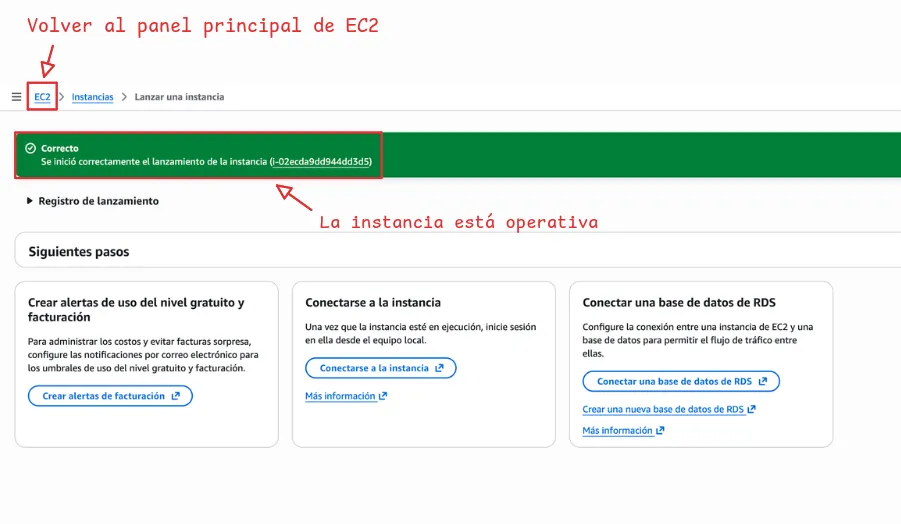
Figura 12. Instancia operativa
Una vez lanzada la instancia, el siguiente paso será volver al panel de EC2 para configurar una IP elástica.
10. Configurar y asignar una IP elástica
Este paso es clave porque la IP del EC2 cambia cada vez que se apaga o se reinicia. Hay que configurar y asignar una IP elástica (fija) para evitar que se caigan los servicios y para luego conectar por SSH siempre a la misma IP sin andar cambiándola a cada rato.
En el panel de EC2, se baja hasta la sección Direcciones IP elásticas para continuar con la configuración.
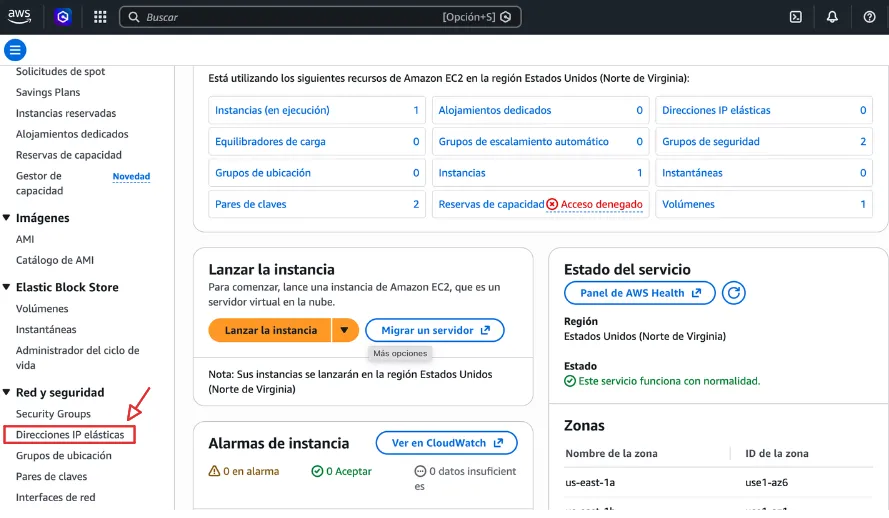
Figura 13. Acceder a Direcciones IP elásticas
Luego, se hace clic en:
Esto abrirá el formulario para configurar la nueva dirección IP.
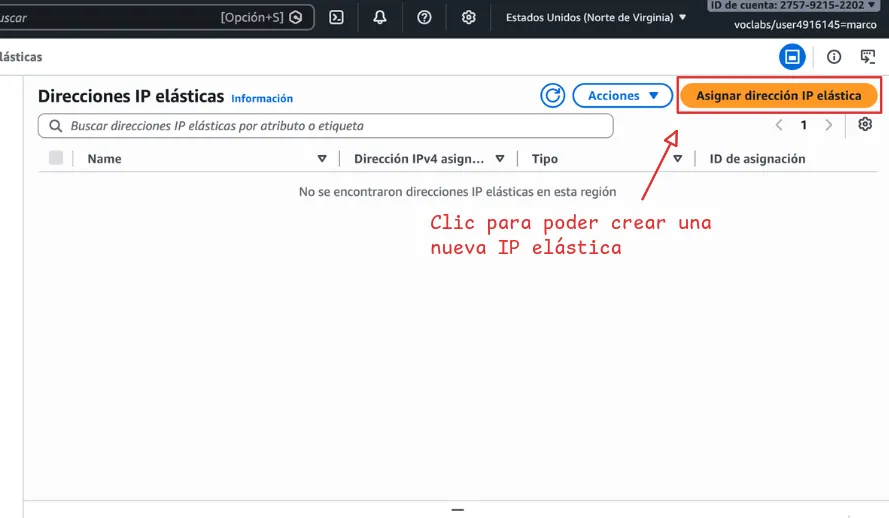
Figura 14. Asignar nueva dirección IP elástica
Se mantiene la configuración predeterminada y se hace clic en:
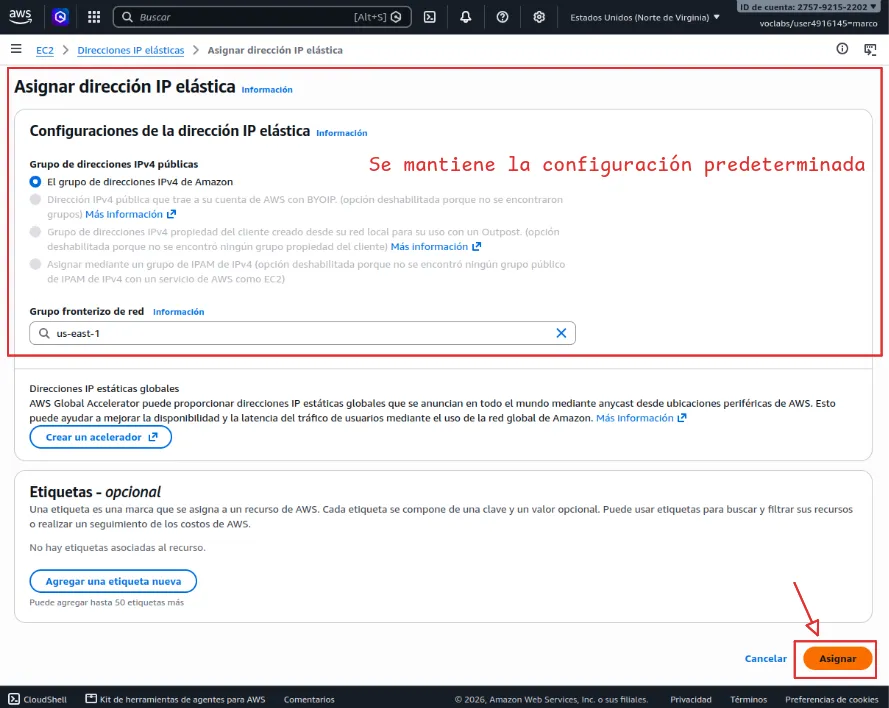
Figura 15. Configurar y asignar
Una vez asignada la IP elástica, se hace clic sobre la IP para acceder a sus opciones.
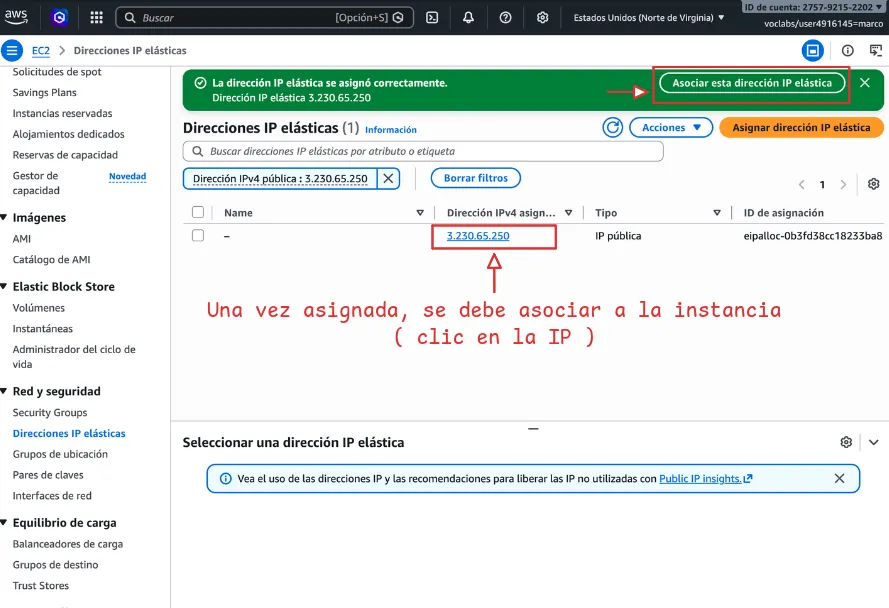
Figura 16. Acceder a las opciones de la IP asignada
Dentro de sus opciones, se hace clic en:
Para ingresar y vincularla a la instancia EC2.
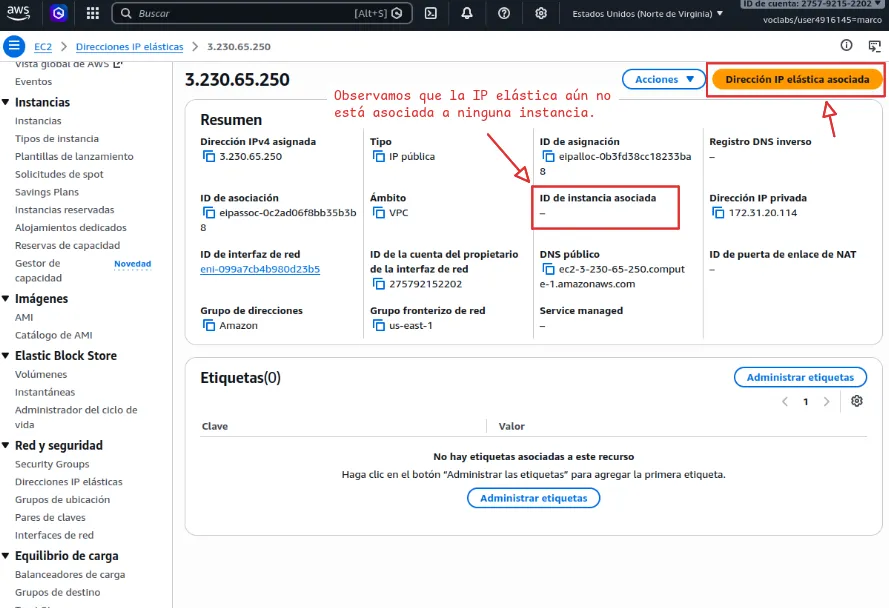
Figura 17. Abrir el formulario para asociar esta IP elástica
En el formulario, se busca la instancia y se hace clic en:
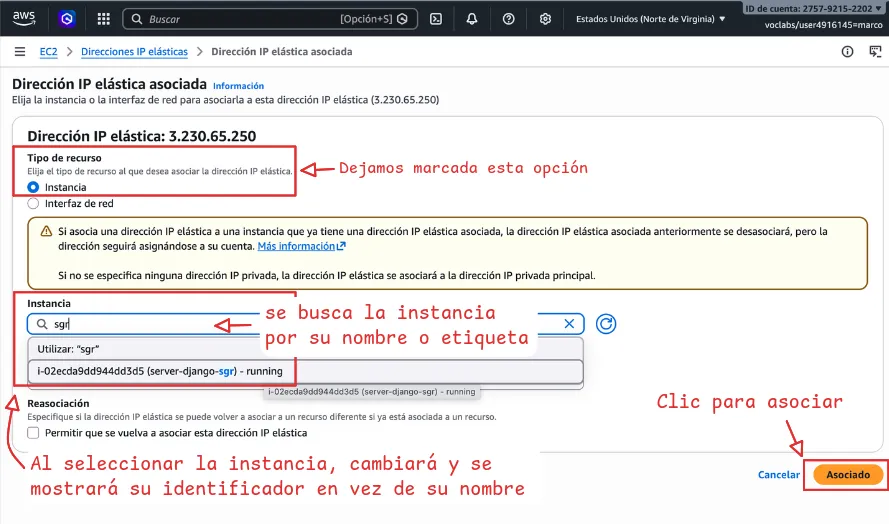
Figura 18. Seleccionar instancia y asociar
11. Conectarse a la instancia
Con una IP elástica asociada a la instancia, la conexión será más sencilla, ya que se mantendrá la misma dirección IP para las conexiones futuras.
Ahora volvemos al panel principal de EC2 para acceder a la instancia.
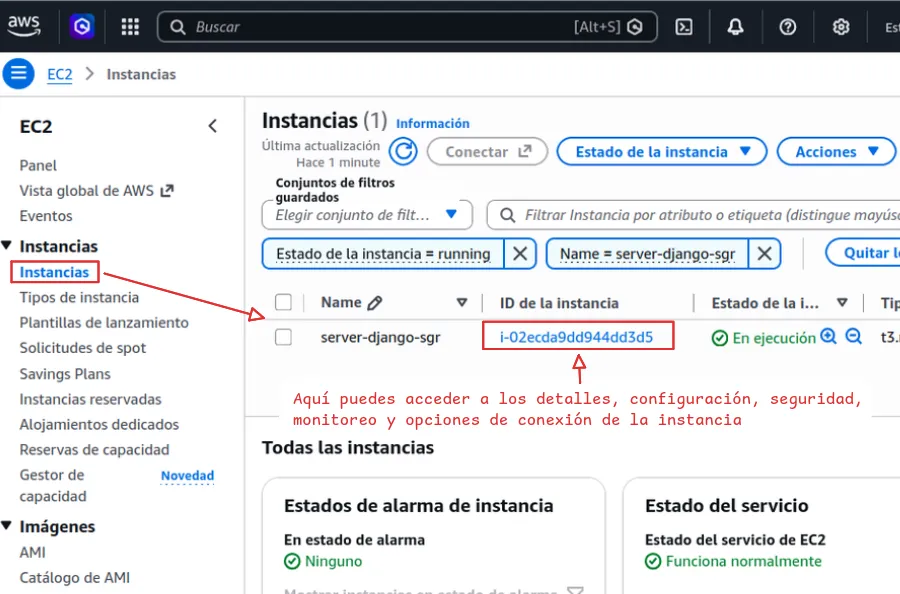
Figura 19. Ingresar a los detalles de la instancia
Ahora, hacemos clic en Conectar para acceder a las opciones de conexión de la instancia.
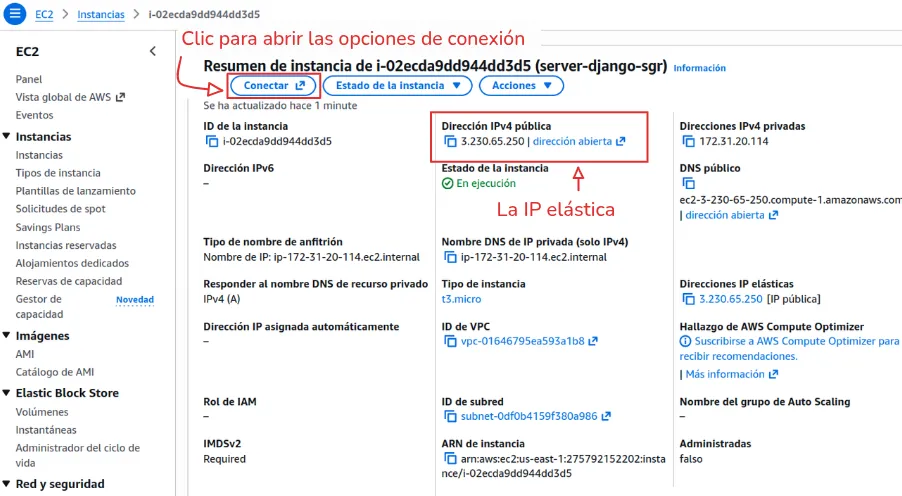
Figura 20. Instrucciones para conectar por SSH
Como podemos observar, la instancia muestra la IP elástica que asignamos previamente.
Luego, en la pestaña En el cliente SSH, encontraremos las instrucciones y el comando necesario para conectarnos al servidor.
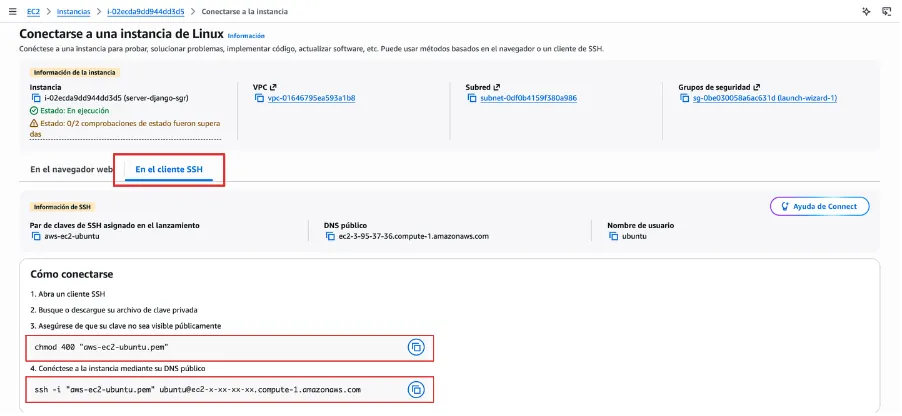
Figura 21. Instrucciones para conectar por SSH
Ahora, debemos ubicarnos en la carpeta donde almacenamos la clave privada y utilizar SSH para conectarnos a la instancia mediante dicha clave.
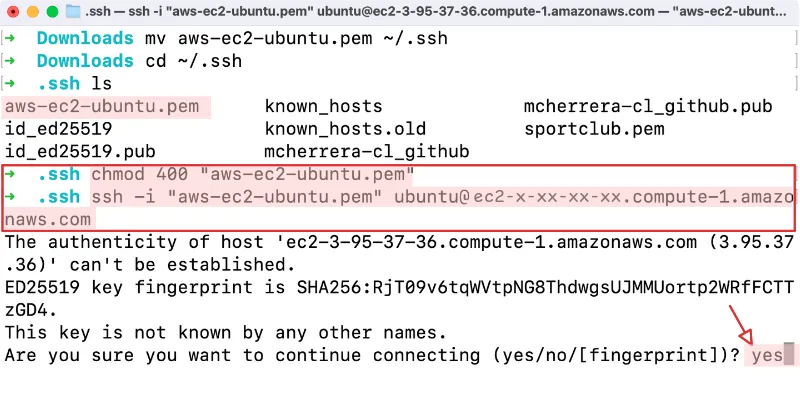
Figura 22. Realizar primera conexión a la instancia
11. Instalar y actualizar las herramientas del sistema
Actualizamos los paquetes del sistema e instalamos Python, pip, el entorno virtual y Git.
sudo apt update && sudo apt upgrade -y # (1)!
- Actualiza los paquetes del sistema.
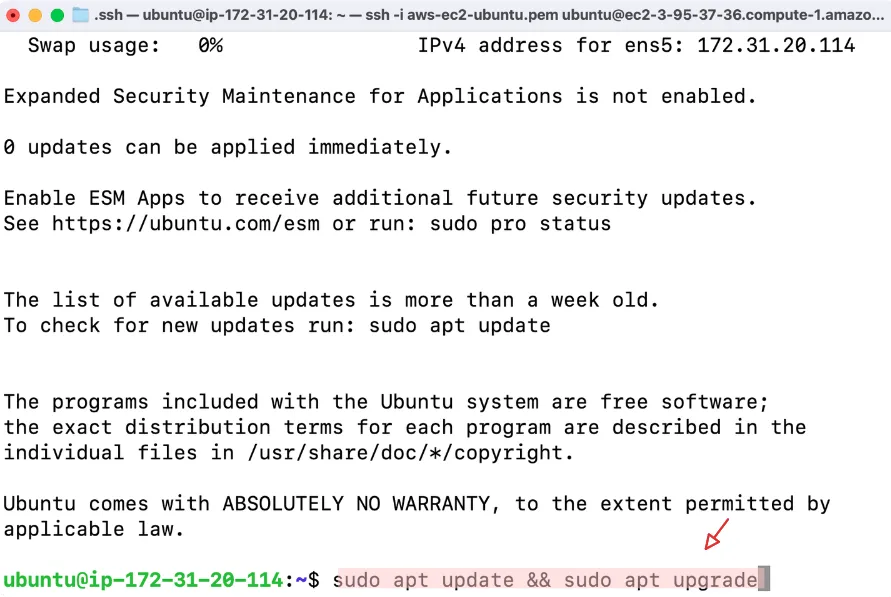
Figura 23. Actualización de los paquetes del sistema
A continuación, instalamos las herramientas necesarias: Python, el paquete para gestionar entornos virtuales y Git.
sudo apt install python3-pip python3-venv git -y # (1)!
- Instala Python, pip, entornos virtuales y Git.
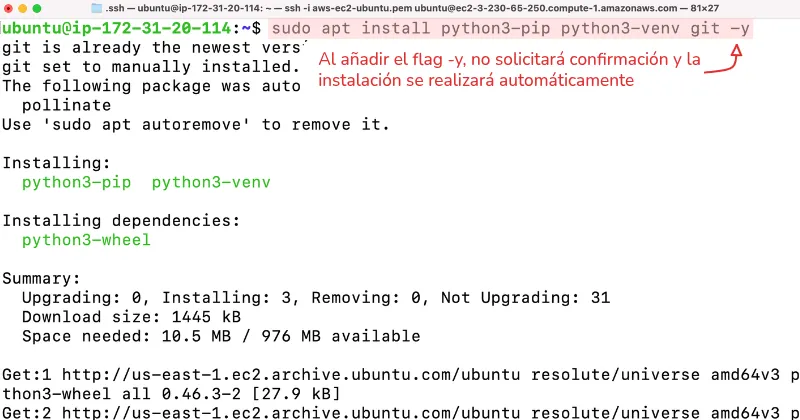
Figura 24. Instalación de las herramientas necesarias
Luego, verificamos las versiones instaladas para comprobar que las herramientas se hayan instalado correctamente.
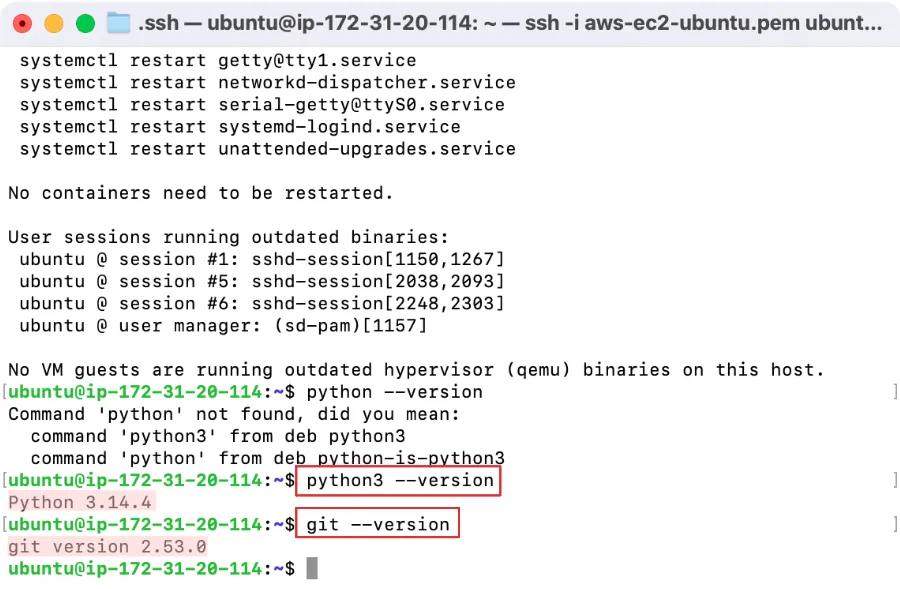
Figura 25. Verificar las versiones de las herramientas
12. Configurar inicial del proyecto
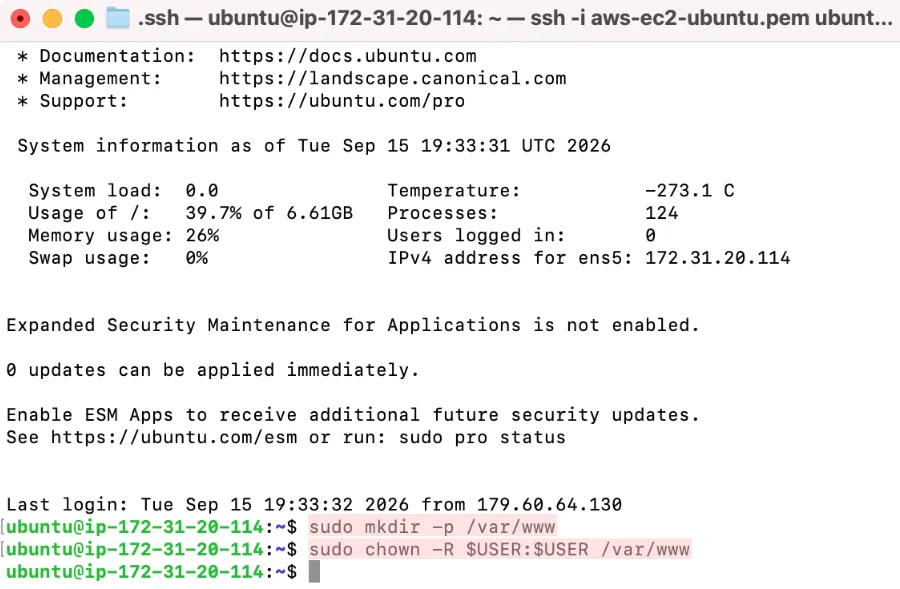
Se crea el directorio /var/www para alojar el proyecto web y se asignan permisos al usuario actual para trabajar con sus archivos.
sudo mkdir -p /var/www  # (1)!
sudo chown -R $USER:$USER /var/www  # (2)!
- Crea el directorio
/var/www, donde se alojará el proyecto web. - Asigna
/var/wwwal usuario actual para permitirle crear y modificar archivos sin privilegios de administrador.
Ubicación del proyecto
Aunque el proyecto puede ubicarse en cualquier directorio, /var/www es una ubicación habitual para alojar aplicaciones web en servidores Linux.
A continuación, se accede al directorio /var/www y se clona el repositorio del proyecto.
cd /var/www
git clone https://github.com/usuario/proyecto-sgr-delegaciones.git
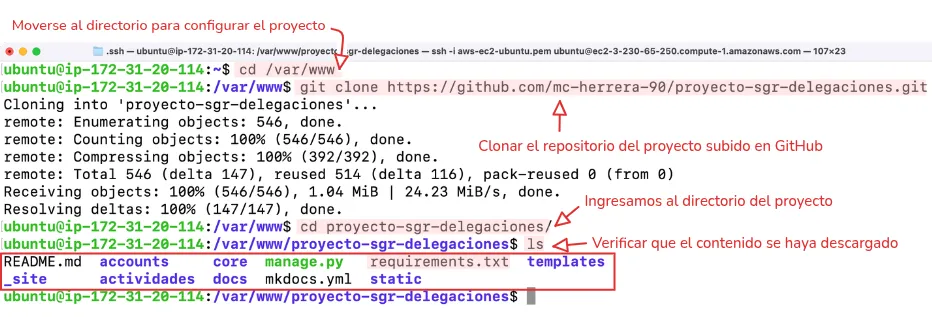
Figura 26. Clonar proyecto desde GitHub
Se crea y activa un entorno virtual para aislar las dependencias del proyecto.
python3 -m venv .venv
source .venv/bin/activate
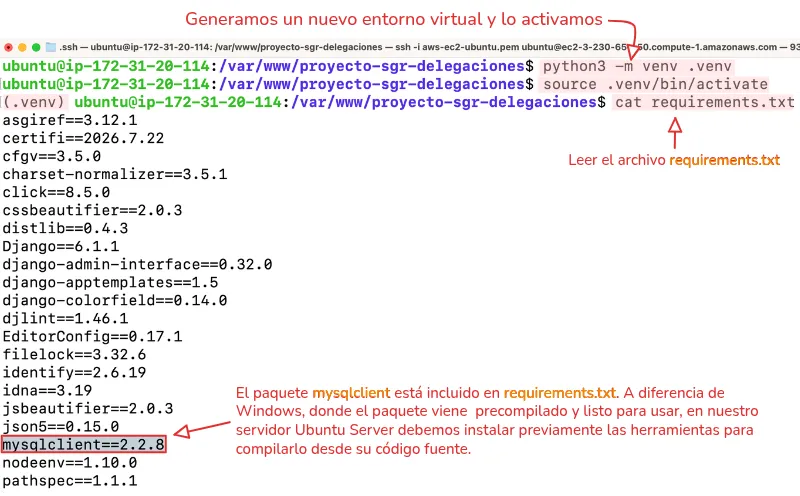
Figura 27. Preparar entorno virtual y ver archivo requirements.txt
Luego, al intentar instalar las dependencias del archivo requirements.txt, si no contamos con las herramientas y librerías necesarias para compilar mysqlclient, se producirá un error.
(.venv) pip install -r requirements.txt
Collecting asgiref==3.12.1 (from -r requirements.txt (line 1))
Downloading asgiref-3.12.1-py3-none-any.whl.metadata (9.4 kB)
Collecting certifi==2026.7.22 (from -r requirements.txt (line 2))
Downloading certifi-2026.7.22-py3-none-any.whl.metadata (2.5 kB)
Collecting cfgv==3.5.0 (from -r requirements.txt (line 3))
Downloading cfgv-3.5.0-py2.py3-none-any.whl.metadata (8.9 kB)
Collecting charset-normalizer==3.5.1 (from -r requirements.txt (line 4))
Downloading charset_normalizer-3.5.1-cp314-cp314-manylinux2014_x86_64.manylinux_2_17_x86_64.manylinux_2_28_x86_64.whl.metadata (45 kB)
Collecting click==8.5.0 (from -r requirements.txt (line 5))
Downloading click-8.5.0-py3-none-any.whl.metadata (2.6 kB)
Collecting cssbeautifier==2.0.3 (from -r requirements.txt (line 6))
Downloading cssbeautifier-2.0.3-py3-none-any.whl.metadata (459 bytes)
Collecting distlib==0.4.3 (from -r requirements.txt (line 7))
Downloading distlib-0.4.3-py2.py3-none-any.whl.metadata (5.3 kB)
Collecting Django==6.1.1 (from -r requirements.txt (line 8))
Downloading django-6.1.1-py3-none-any.whl.metadata (3.9 kB)
Collecting django-admin-interface==0.32.0 (from -r requirements.txt (line 9))
Downloading django_admin_interface-0.32.0-py3-none-any.whl.metadata (17 kB)
Collecting django-apptemplates==1.5 (from -r requirements.txt (line 10))
Downloading django-apptemplates-1.5.tar.gz (5.1 kB)
Installing build dependencies ... done
Getting requirements to build wheel ... done
Preparing metadata (pyproject.toml) ... done
Collecting django-colorfield==0.14.0 (from -r requirements.txt (line 11))
Downloading django_colorfield-0.14.0-py3-none-any.whl.metadata (11 kB)
Collecting djlint==1.46.1 (from -r requirements.txt (line 12))
Downloading djlint-1.46.1-cp314-cp314-manylinux2014_x86_64.manylinux_2_17_x86_64.manylinux_2_28_x86_64.whl.metadata (9.1 kB)
Collecting EditorConfig==0.17.1 (from -r requirements.txt (line 13))
Downloading editorconfig-0.17.1-py3-none-any.whl.metadata (3.9 kB)
Collecting filelock==3.32.6 (from -r requirements.txt (line 14))
Downloading filelock-3.32.6-py3-none-any.whl.metadata (2.0 kB)
Collecting identify==2.6.19 (from -r requirements.txt (line 15))
Downloading identify-2.6.19-py2.py3-none-any.whl.metadata (4.4 kB)
Collecting idna==3.19 (from -r requirements.txt (line 16))
Downloading idna-3.19-py3-none-any.whl.metadata (9.2 kB)
Collecting jsbeautifier==2.0.3 (from -r requirements.txt (line 17))
Downloading jsbeautifier-2.0.3-py3-none-any.whl.metadata (481 bytes)
Collecting json5==0.15.0 (from -r requirements.txt (line 18))
Downloading json5-0.15.0-py3-none-any.whl.metadata (37 kB)
Collecting mysqlclient==2.2.8 (from -r requirements.txt (line 19))
Downloading mysqlclient-2.2.8.tar.gz (92 kB)
Installing build dependencies ... done
Getting requirements to build wheel ... error
error: subprocess-exited-with-error

× Getting requirements to build wheel did not run successfully.
│ exit code: 1
╰─> [35 lines of output]
    /bin/sh: 1: pkg-config: not found
    /bin/sh: 1: pkg-config: not found
    /bin/sh: 1: pkg-config: not found
    /bin/sh: 1: pkg-config: not found
    Trying pkg-config --exists mysqlclient
    Command 'pkg-config --exists mysqlclient' returned non-zero exit status 127.
    Trying pkg-config --exists mariadb
    Command 'pkg-config --exists mariadb' returned non-zero exit status 127.
    Trying pkg-config --exists libmariadb
    Command 'pkg-config --exists libmariadb' returned non-zero exit status 127.
    Trying pkg-config --exists perconaserverclient
    Command 'pkg-config --exists perconaserverclient' returned non-zero exit status 127.
    Traceback (most recent call last):
        File "/var/www/proyecto-sgr-delegaciones/.venv/lib/python3.14/site-packages/pip/_vendor/pyproject_hooks/_in_process/_in_process.py", line 389, in <module>
        main()
        ~~~~^^
        File "/var/www/proyecto-sgr-delegaciones/.venv/lib/python3.14/site-packages/pip/_vendor/pyproject_hooks/_in_process/_in_process.py", line 373, in main
        json_out["return_val"] = hook(**hook_input["kwargs"])
                                ~~~~^^^^^^^^^^^^^^^^^^^^^^^^
        File "/var/www/proyecto-sgr-delegaciones/.venv/lib/python3.14/site-packages/pip/_vendor/pyproject_hooks/_in_process/_in_process.py", line 143, in get_requires_for_build_wheel
        return hook(config_settings)
        File "/tmp/pip-build-env-14gdpasp/overlay/lib/python3.14/site-packages/setuptools/build_meta.py", line 333, in get_requires_for_build_wheel
        return self._get_build_requires(config_settings, requirements=[])
                ~~~~~~~~~~~~~~~~~~~~~~~~^^^^^^^^^^^^^^^^^^^^^^^^^^^^^^^^^^
        File "/tmp/pip-build-env-14gdpasp/overlay/lib/python3.14/site-packages/setuptools/build_meta.py", line 301, in _get_build_requires
        self.run_setup()
        ~~~~~~~~~~~~~~^^
        File "/tmp/pip-build-env-14gdpasp/overlay/lib/python3.14/site-packages/setuptools/build_meta.py", line 317, in run_setup
        exec(code, locals())  # noqa: S102 # exec is intentional here
        ~~~~^^^^^^^^^^^^^^^^
        File "<string>", line 156, in <module>
        File "<string>", line 49, in get_config_posix
        File "<string>", line 28, in find_package_name
    Exception: Can not find valid pkg-config name.
    Specify MYSQLCLIENT_CFLAGS and MYSQLCLIENT_LDFLAGS env vars manually
    [end of output]

note: This error originates from a subprocess, and is likely not a problem with pip.
error: subprocess-exited-with-error

× Getting requirements to build wheel did not run successfully.
│ exit code: 1
╰─> See above for output.

note: This error originates from a subprocess, and is likely not a problem with pip.
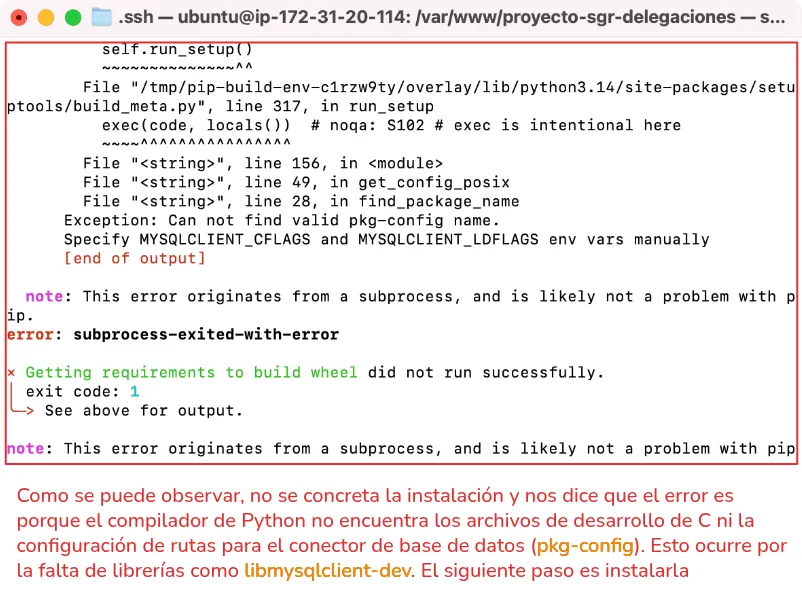
Figura 28. Error al instalar las dependencias de mysqlclient
Para solucionarlo, procedemos a instalar las herramientas necesarias para compilar el driver de conexión.
(.venv) sudo apt install -y \
build-essential \#(1)!
pkg-config \#(2)!
default-libmysqlclient-dev \#(3)!
python3-dev \#(4)!
- Herramientas necesarias para compilar paquetes.
- Herramienta para gestionar la configuración de compilación.
- Archivos de desarrollo necesarios para compilar
mysqlclient. - Archivos de desarrollo de Python necesarios para compilar extensiones.
build-essential is already the newest version (12.12ubuntu2.26.04.2).
build-essential set to manually installed.
The following package was automatically installed and is no longer required:
pollinate
Use 'sudo apt autoremove' to remove it.

Installing:
default-libmysqlclient-dev  pkg-config

Installing dependencies:
libmysqlclient-dev  libpkgconf7  libzstd-dev   pkgconf
libmysqlclient24    libssl-dev   mysql-common  pkgconf-bin

Suggested packages:
libssl-doc

Summary:
Upgrading: 0, Installing: 10, Removing: 0, Not Upgrading: 3
Download size: 6300 kB
Space needed: 34.3 MB / 3922 MB available

Get:1 http://us-east-1.ec2.archive.ubuntu.com/ubuntu resolute/main amd64v3 mysql-common all 5.8+1.1.1ubuntu2 [7002 B]
Get:2 http://us-east-1.ec2.archive.ubuntu.com/ubuntu resolute-updates/main amd64v3 libmysqlclient24 amd64 8.4.11-0ubuntu0.26.04.1 [1259 kB]
Get:3 http://us-east-1.ec2.archive.ubuntu.com/ubuntu resolute-updates/main amd64v3 libssl-dev amd64 3.5.5-1ubuntu3.5 [2940 kB]
Get:4 http://us-east-1.ec2.archive.ubuntu.com/ubuntu resolute/main amd64v3 libzstd-dev amd64 1.5.7+dfsg-3 [364 kB]
Get:5 http://us-east-1.ec2.archive.ubuntu.com/ubuntu resolute-updates/main amd64v3 libmysqlclient-dev amd64 8.4.11-0ubuntu0.26.04.1 [1637 kB]
Get:6 http://us-east-1.ec2.archive.ubuntu.com/ubuntu resolute/main amd64v3 default-libmysqlclient-dev amd64 1.1.1ubuntu2 [3398 B]
Get:7 http://us-east-1.ec2.archive.ubuntu.com/ubuntu resolute/main amd64v3 libpkgconf7 amd64 2.5.1-4 [38.8 kB]
Get:8 http://us-east-1.ec2.archive.ubuntu.com/ubuntu resolute/main amd64v3 pkgconf-bin amd64 2.5.1-4 [22.8 kB]
Get:9 http://us-east-1.ec2.archive.ubuntu.com/ubuntu resolute/main amd64v3 pkgconf amd64 2.5.1-4 [20.0 kB]
Get:10 http://us-east-1.ec2.archive.ubuntu.com/ubuntu resolute/main amd64v3 pkg-config amd64 2.5.1-4 [7696 B]
Fetched 6300 kB in 0s (51.9 MB/s)
Selecting previously unselected package mysql-common.
(Reading database ... 131732 files and directories currently installed.)
Preparing to unpack .../0-mysql-common_5.8+1.1.1ubuntu2_all.deb ...
Unpacking mysql-common (5.8+1.1.1ubuntu2) ...
Selecting previously unselected package libmysqlclient24:amd64.
Preparing to unpack .../1-libmysqlclient24_8.4.11-0ubuntu0.26.04.1_amd64v3.deb ...
Unpacking libmysqlclient24:amd64 (8.4.11-0ubuntu0.26.04.1) ...
Selecting previously unselected package libssl-dev:amd64.
Preparing to unpack .../2-libssl-dev_3.5.5-1ubuntu3.5_amd64v3.deb ...
Unpacking libssl-dev:amd64 (3.5.5-1ubuntu3.5) ...
Selecting previously unselected package libzstd-dev:amd64.
Preparing to unpack .../3-libzstd-dev_1.5.7+dfsg-3_amd64v3.deb ...
Unpacking libzstd-dev:amd64 (1.5.7+dfsg-3) ...
Selecting previously unselected package libmysqlclient-dev.
Preparing to unpack .../4-libmysqlclient-dev_8.4.11-0ubuntu0.26.04.1_amd64v3.deb ...
Unpacking libmysqlclient-dev (8.4.11-0ubuntu0.26.04.1) ...
Selecting previously unselected package default-libmysqlclient-dev:amd64.
Preparing to unpack .../5-default-libmysqlclient-dev_1.1.1ubuntu2_amd64v3.deb ...
Unpacking default-libmysqlclient-dev:amd64 (1.1.1ubuntu2) ...
Selecting previously unselected package libpkgconf7:amd64.
Preparing to unpack .../6-libpkgconf7_2.5.1-4_amd64v3.deb ...
Unpacking libpkgconf7:amd64 (2.5.1-4) ...
Selecting previously unselected package pkgconf-bin.
Preparing to unpack .../7-pkgconf-bin_2.5.1-4_amd64v3.deb ...
Unpacking pkgconf-bin (2.5.1-4) ...
Selecting previously unselected package pkgconf:amd64.
Preparing to unpack .../8-pkgconf_2.5.1-4_amd64v3.deb ...
Unpacking pkgconf:amd64 (2.5.1-4) ...
Selecting previously unselected package pkg-config:amd64.
Preparing to unpack .../9-pkg-config_2.5.1-4_amd64v3.deb ...
Unpacking pkg-config:amd64 (2.5.1-4) ...
Setting up mysql-common (5.8+1.1.1ubuntu2) ...
update-alternatives: using /etc/mysql/my.cnf.fallback to provide /etc/mysql/my.cnf (my.cnf) in aut
o mode
Setting up libzstd-dev:amd64 (1.5.7+dfsg-3) ...
Setting up libpkgconf7:amd64 (2.5.1-4) ...
Setting up libmysqlclient24:amd64 (8.4.11-0ubuntu0.26.04.1) ...
Setting up libssl-dev:amd64 (3.5.5-1ubuntu3.5) ...
Setting up pkgconf-bin (2.5.1-4) ...
Setting up libmysqlclient-dev (8.4.11-0ubuntu0.26.04.1) ...
Setting up default-libmysqlclient-dev:amd64 (1.1.1ubuntu2) ...
Setting up pkgconf:amd64 (2.5.1-4) ...
Setting up pkg-config:amd64 (2.5.1-4) ...
Processing triggers for man-db (2.13.1-1build1) ...
Processing triggers for libc-bin (2.43-2ubuntu2.4) ...
Scanning processes...
Scanning candidates...
Scanning linux images...

Pending kernel upgrade!
Running kernel version:
7.0.0-1006-aws
Diagnostics:
The currently running kernel version is not the expected kernel version 7.0.0-1013-aws.

Restarting the system to load the new kernel will not be handled automatically, so you should
consider rebooting.

Restarting services...

Service restarts being deferred:
/etc/needrestart/restart.d/dbus.service
systemctl restart getty@tty1.service
systemctl restart networkd-dispatcher.service
systemctl restart serial-getty@ttyS0.service
systemctl restart systemd-logind.service
systemctl restart unattended-upgrades.service

No containers need to be restarted.

User sessions running outdated binaries:
ubuntu @ session #1: sshd-session[1151,1310]
ubuntu @ session #3: sshd-session[1360,1460]
ubuntu @ user manager: (sd-pam)[1200]

No VM guests are running outdated hypervisor (qemu) binaries on this host.
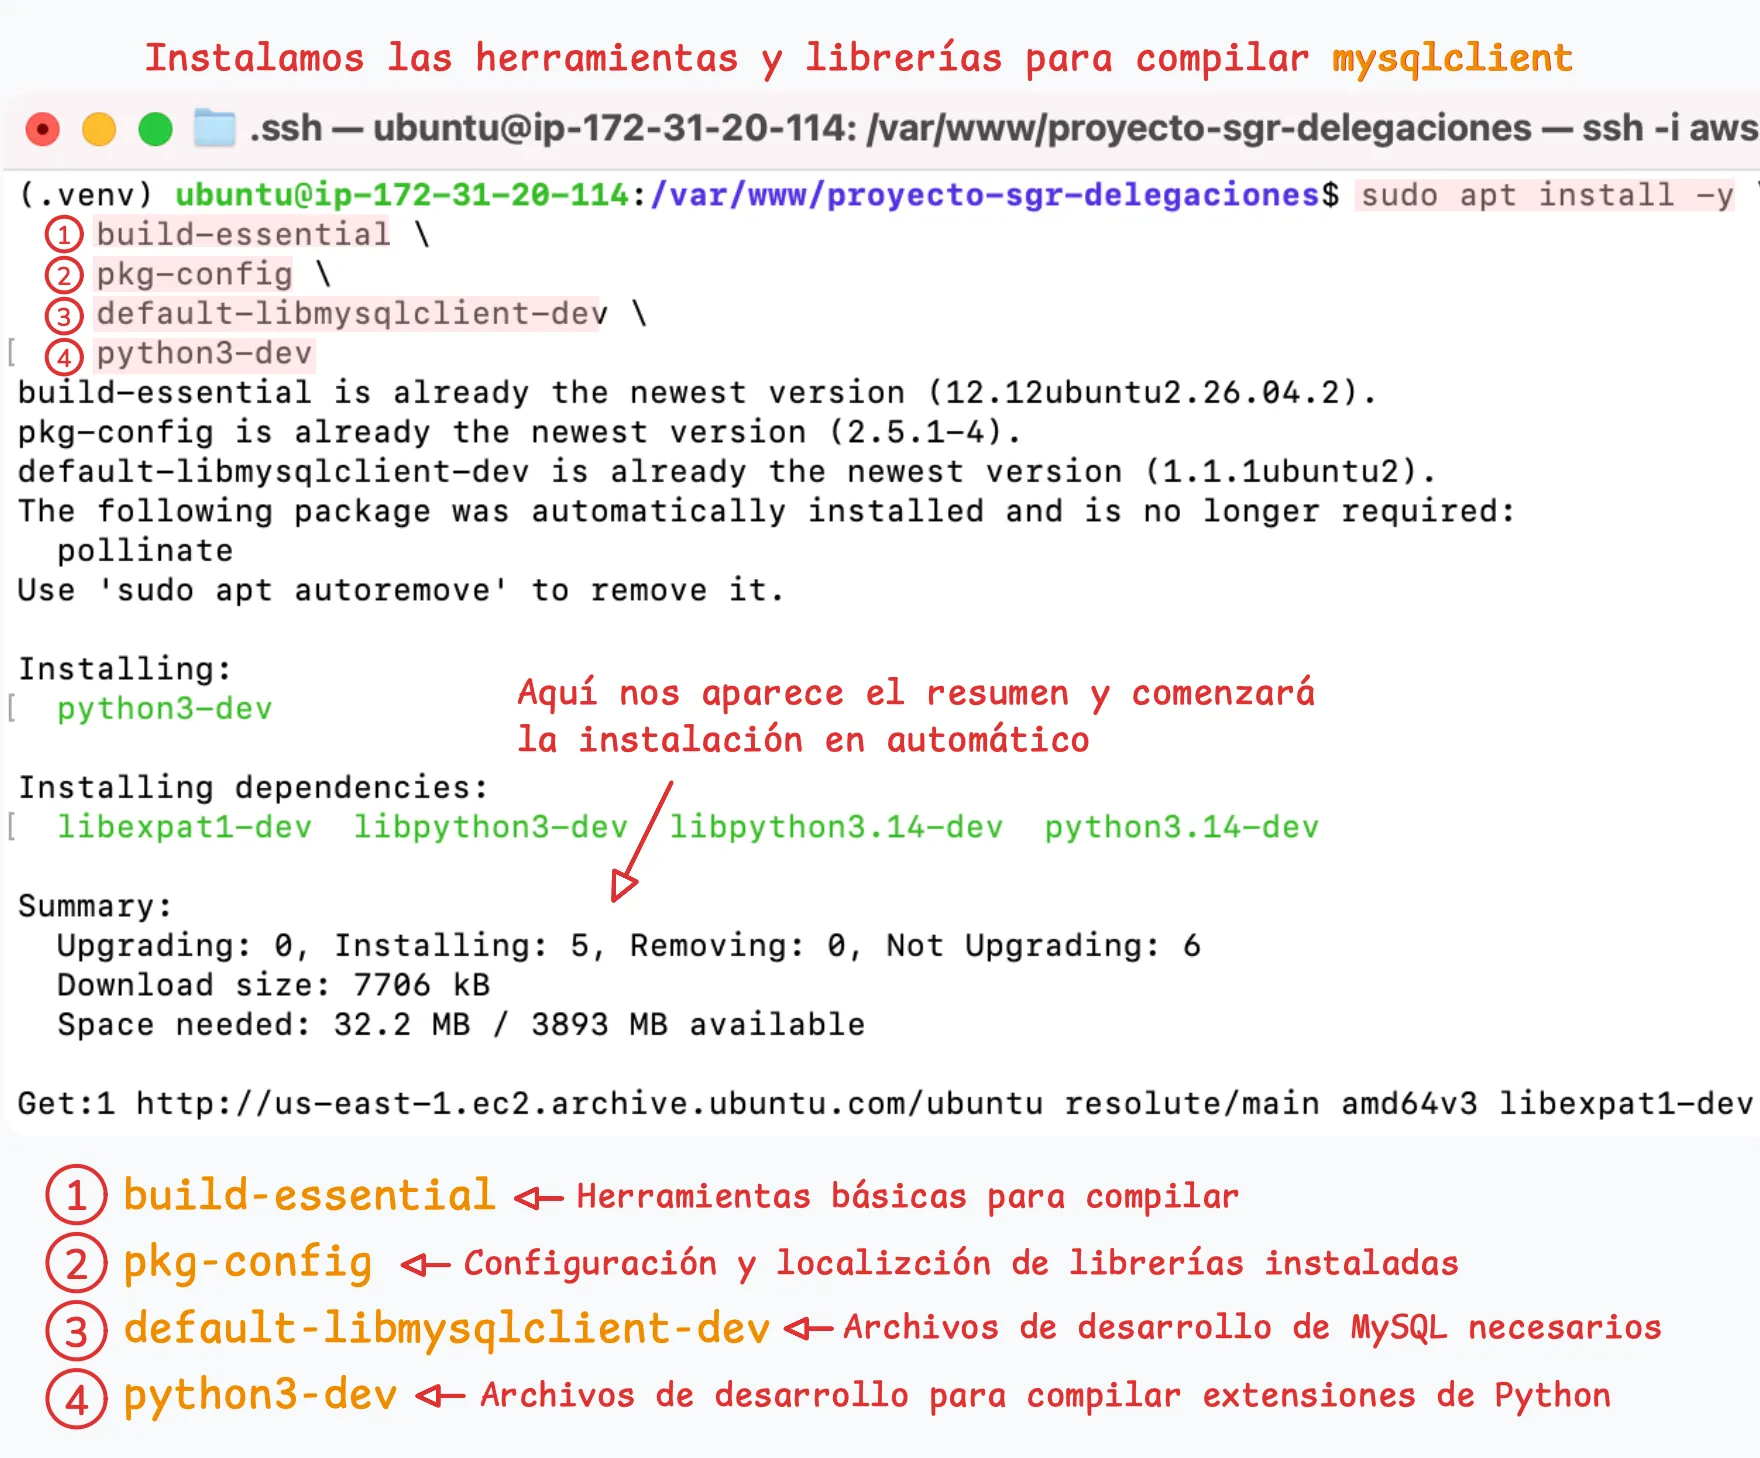
Figura 29. Instalando las herramientas y librerías para compilar mysqlclient
Con la instalación anterior, podemos repetir el proceso de instalación de las dependencias del proyecto, comprobando que esta vez finalice correctamente.
(.venv) pip install -r requirements.txt
Collecting asgiref==3.12.1 (from -r requirements.txt (line 1))
Using cached asgiref-3.12.1-py3-none-any.whl.metadata (9.4 kB)
Collecting certifi==2026.7.22 (from -r requirements.txt (line 2))
Using cached certifi-2026.7.22-py3-none-any.whl.metadata (2.5 kB)
Collecting cfgv==3.5.0 (from -r requirements.txt (line 3))
Using cached cfgv-3.5.0-py2.py3-none-any.whl.metadata (8.9 kB)
Collecting charset-normalizer==3.5.1 (from -r requirements.txt (line 4))
Using cached charset_normalizer-3.5.1-cp314-cp314-manylinux2014_x86_64.manylinux_2_17_x86_64.manylinux_2_28_x86_64.whl.metadata (45 kB)
Collecting click==8.5.0 (from -r requirements.txt (line 5))
Using cached click-8.5.0-py3-none-any.whl.metadata (2.6 kB)
Collecting cssbeautifier==2.0.3 (from -r requirements.txt (line 6))
Using cached cssbeautifier-2.0.3-py3-none-any.whl.metadata (459 bytes)
Collecting distlib==0.4.3 (from -r requirements.txt (line 7))
Using cached distlib-0.4.3-py2.py3-none-any.whl.metadata (5.3 kB)
Collecting Django==6.1.1 (from -r requirements.txt (line 8))
Using cached django-6.1.1-py3-none-any.whl.metadata (3.9 kB)
Collecting django-admin-interface==0.32.0 (from -r requirements.txt (line 9))
Using cached django_admin_interface-0.32.0-py3-none-any.whl.metadata (17 kB)
Collecting django-apptemplates==1.5 (from -r requirements.txt (line 10))
Using cached django-apptemplates-1.5.tar.gz (5.1 kB)
Installing build dependencies ... done
Getting requirements to build wheel ... done
Preparing metadata (pyproject.toml) ... done
Collecting django-colorfield==0.14.0 (from -r requirements.txt (line 11))
Using cached django_colorfield-0.14.0-py3-none-any.whl.metadata (11 kB)
Collecting djlint==1.46.1 (from -r requirements.txt (line 12))
Using cached djlint-1.46.1-cp314-cp314-manylinux2014_x86_64.manylinux_2_17_x86_64.manylinux_2_28_x86_64.whl.metadata (9.1 kB)
Collecting EditorConfig==0.17.1 (from -r requirements.txt (line 13))
Using cached editorconfig-0.17.1-py3-none-any.whl.metadata (3.9 kB)
Collecting filelock==3.32.6 (from -r requirements.txt (line 14))
Using cached filelock-3.32.6-py3-none-any.whl.metadata (2.0 kB)
Collecting identify==2.6.19 (from -r requirements.txt (line 15))
Using cached identify-2.6.19-py2.py3-none-any.whl.metadata (4.4 kB)
Collecting idna==3.19 (from -r requirements.txt (line 16))
Using cached idna-3.19-py3-none-any.whl.metadata (9.2 kB)
Collecting jsbeautifier==2.0.3 (from -r requirements.txt (line 17))
Using cached jsbeautifier-2.0.3-py3-none-any.whl.metadata (481 bytes)
Collecting json5==0.15.0 (from -r requirements.txt (line 18))
Using cached json5-0.15.0-py3-none-any.whl.metadata (37 kB)
Collecting mysqlclient==2.2.8 (from -r requirements.txt (line 19))
Using cached mysqlclient-2.2.8.tar.gz (92 kB)
Installing build dependencies ... done
Getting requirements to build wheel ... done
Preparing metadata (pyproject.toml) ... done
Collecting nodeenv==1.10.0 (from -r requirements.txt (line 20))
Downloading nodeenv-1.10.0-py2.py3-none-any.whl.metadata (24 kB)
Collecting pathspec==1.1.1 (from -r requirements.txt (line 21))
Downloading pathspec-1.1.1-py3-none-any.whl.metadata (14 kB)
Collecting pillow==12.3.0 (from -r requirements.txt (line 22))
Downloading pillow-12.3.0-cp314-cp314-manylinux_2_27_x86_64.manylinux_2_28_x86_64.whl.metadata (9.1 kB)
Collecting platformdirs==4.11.8 (from -r requirements.txt (line 23))
Downloading platformdirs-4.11.8-py3-none-any.whl.metadata (5.5 kB)
Collecting pre_commit==4.6.2 (from -r requirements.txt (line 24))
Downloading pre_commit-4.6.2-py2.py3-none-any.whl.metadata (1.2 kB)
Collecting python-decouple==3.8 (from -r requirements.txt (line 25))
Downloading python_decouple-3.8-py3-none-any.whl.metadata (14 kB)
Collecting python-discovery==1.6.0 (from -r requirements.txt (line 26))
Downloading python_discovery-1.6.0-py3-none-any.whl.metadata (5.1 kB)
Collecting python-slugify==8.0.4 (from -r requirements.txt (line 27))
Downloading python_slugify-8.0.4-py2.py3-none-any.whl.metadata (8.5 kB)
Collecting PyYAML==6.0.3 (from -r requirements.txt (line 28))
Downloading pyyaml-6.0.3-cp314-cp314-manylinux2014_x86_64.manylinux_2_17_x86_64.manylinux_2_28_x86_64.whl.metadata (2.4 kB)
Collecting regex==2026.9.10 (from -r requirements.txt (line 29))
Downloading regex-2026.9.10-cp314-cp314-manylinux2014_x86_64.manylinux_2_17_x86_64.manylinux_2_28_x86_64.whl.metadata (40 kB)
Collecting requests==2.34.2 (from -r requirements.txt (line 30))
Downloading requests-2.34.2-py3-none-any.whl.metadata (4.8 kB)
Collecting sqlparse==0.6.0 (from -r requirements.txt (line 31))
Downloading sqlparse-0.6.0-py3-none-any.whl.metadata (6.0 kB)
Collecting text-unidecode==1.3 (from -r requirements.txt (line 32))
Downloading text_unidecode-1.3-py2.py3-none-any.whl.metadata (2.4 kB)
Collecting urllib3==2.7.0 (from -r requirements.txt (line 33))
Downloading urllib3-2.7.0-py3-none-any.whl.metadata (6.9 kB)
Collecting virtualenv==21.7.9 (from -r requirements.txt (line 34))
Downloading virtualenv-21.7.9-py3-none-any.whl.metadata (3.5 kB)
Downloading asgiref-3.12.1-py3-none-any.whl (25 kB)
Downloading certifi-2026.7.22-py3-none-any.whl (136 kB)
Downloading cfgv-3.5.0-py2.py3-none-any.whl (7.4 kB)
Downloading charset_normalizer-3.5.1-cp314-cp314-manylinux2014_x86_64.manylinux_2_17_x86_64.manylinux_2_28_x86_64.whl (251 kB)
Downloading click-8.5.0-py3-none-any.whl (125 kB)
Downloading cssbeautifier-2.0.3-py3-none-any.whl (122 kB)
Downloading distlib-0.4.3-py2.py3-none-any.whl (470 kB)
Downloading django-6.1.1-py3-none-any.whl (8.4 MB)
━━━━━━━━━━━━━━━━━━━━━━━━━━━━━━━━━━━━━━━━ 8.4/8.4 MB 143.8 MB/s eta 0:00:00
Downloading django_admin_interface-0.32.0-py3-none-any.whl (266 kB)
Downloading django_colorfield-0.14.0-py3-none-any.whl (34 kB)
Downloading python_slugify-8.0.4-py2.py3-none-any.whl (10 kB)
Downloading djlint-1.46.1-cp314-cp314-manylinux2014_x86_64.manylinux_2_17_x86_64.manylinux_2_28_x86_64.whl (1.4 MB)
━━━━━━━━━━━━━━━━━━━━━━━━━━━━━━━━━━━━━━━━ 1.4/1.4 MB 87.3 MB/s eta 0:00:00
Downloading editorconfig-0.17.1-py3-none-any.whl (16 kB)
Downloading filelock-3.32.6-py3-none-any.whl (100 kB)
Downloading identify-2.6.19-py2.py3-none-any.whl (99 kB)
Downloading idna-3.19-py3-none-any.whl (68 kB)
Downloading jsbeautifier-2.0.3-py3-none-any.whl (93 kB)
Downloading json5-0.15.0-py3-none-any.whl (36 kB)
Downloading nodeenv-1.10.0-py2.py3-none-any.whl (23 kB)
Downloading pathspec-1.1.1-py3-none-any.whl (57 kB)
Downloading pillow-12.3.0-cp314-cp314-manylinux_2_27_x86_64.manylinux_2_28_x86_64.whl (6.9 MB)
━━━━━━━━━━━━━━━━━━━━━━━━━━━━━━━━━━━━━━━━ 6.9/6.9 MB 110.1 MB/s eta 0:00:00
Downloading platformdirs-4.11.8-py3-none-any.whl (24 kB)
Downloading pre_commit-4.6.2-py2.py3-none-any.whl (226 kB)
Downloading python_decouple-3.8-py3-none-any.whl (9.9 kB)
Downloading python_discovery-1.6.0-py3-none-any.whl (38 kB)
Downloading pyyaml-6.0.3-cp314-cp314-manylinux2014_x86_64.manylinux_2_17_x86_64.manylinux_2_28_x86_64.whl (794 kB)
━━━━━━━━━━━━━━━━━━━━━━━━━━━━━━━━━━━━━━━━ 794.2/794.2 kB 45.7 MB/s eta 0:00:00
Downloading regex-2026.9.10-cp314-cp314-manylinux2014_x86_64.manylinux_2_17_x86_64.manylinux_2_28_x86_64.whl (803 kB)
━━━━━━━━━━━━━━━━━━━━━━━━━━━━━━━━━━━━━━━━ 803.7/803.7 kB 37.6 MB/s eta 0:00:00
Downloading requests-2.34.2-py3-none-any.whl (73 kB)
Downloading urllib3-2.7.0-py3-none-any.whl (131 kB)
Downloading sqlparse-0.6.0-py3-none-any.whl (50 kB)
Downloading text_unidecode-1.3-py2.py3-none-any.whl (78 kB)
Downloading virtualenv-21.7.9-py3-none-any.whl (5.3 MB)
━━━━━━━━━━━━━━━━━━━━━━━━━━━━━━━━━━━━━━━━ 5.3/5.3 MB 137.8 MB/s eta 0:00:00
Building wheels for collected packages: django-apptemplates, mysqlclient
Building wheel for django-apptemplates (pyproject.toml) ... done
Created wheel for django-apptemplates: filename=django_apptemplates-1.5-py3-none-any.whl size=5556 sha256=b9aed6c627fa2c80cc230923ff440e302d0e6f219a9e7012dbe41c242a94a6f7
Stored in directory: /home/ubuntu/.cache/pip/wheels/4e/60/7b/1033ba51a7e8385d5d0966bf36fe04ea5ea781a890b12b131c
Building wheel for mysqlclient (pyproject.toml) ... done
Created wheel for mysqlclient: filename=mysqlclient-2.2.8-cp314-cp314-linux_x86_64.whl size=130157 sha256=8075aa3aea7047c3ccde122c7e0f59ee13df7c553bde99d4552fea75c07ed9c4
Stored in directory: /home/ubuntu/.cache/pip/wheels/dc/6c/f2/d2b7580418272e66d38459c09d5bf1f10b3bf9dbe12a79918a
Successfully built django-apptemplates mysqlclient
Installing collected packages: text-unidecode, python-decouple, django-apptemplates, distlib, urllib3, sqlparse, regex, PyYAML, python-slugify, platformdirs, pillow, pathspec, nodeenv, mysqlclient, json5, idna, identify, filelock, EditorConfig, click, charset-normalizer, cfgv, certifi, asgiref, requests, python-discovery, jsbeautifier, django-colorfield, Django, virtualenv, django-admin-interface, cssbeautifier, pre_commit, djlint
Successfully installed Django-6.1.1 EditorConfig-0.17.1 PyYAML-6.0.3 asgiref-3.12.1 certifi-2026.7.22 cfgv-3.5.0 charset-normalizer-3.5.1 click-8.5.0 cssbeautifier-2.0.3 distlib-0.4.3 django-admin-interface-0.32.0 django-apptemplates-1.5 django-colorfield-0.14.0 djlint-1.46.1 filelock-3.32.6 identify-2.6.19 idna-3.19 jsbeautifier-2.0.3 json5-0.15.0 mysqlclient-2.2.8 nodeenv-1.10.0 pathspec-1.1.1 pillow-12.3.0 platformdirs-4.11.8 pre_commit-4.6.2 python-decouple-3.8 python-discovery-1.6.0 python-slugify-8.0.4 regex-2026.9.10 requests-2.34.2 sqlparse-0.6.0 text-unidecode-1.3 urllib3-2.7.0 virtualenv-21.7
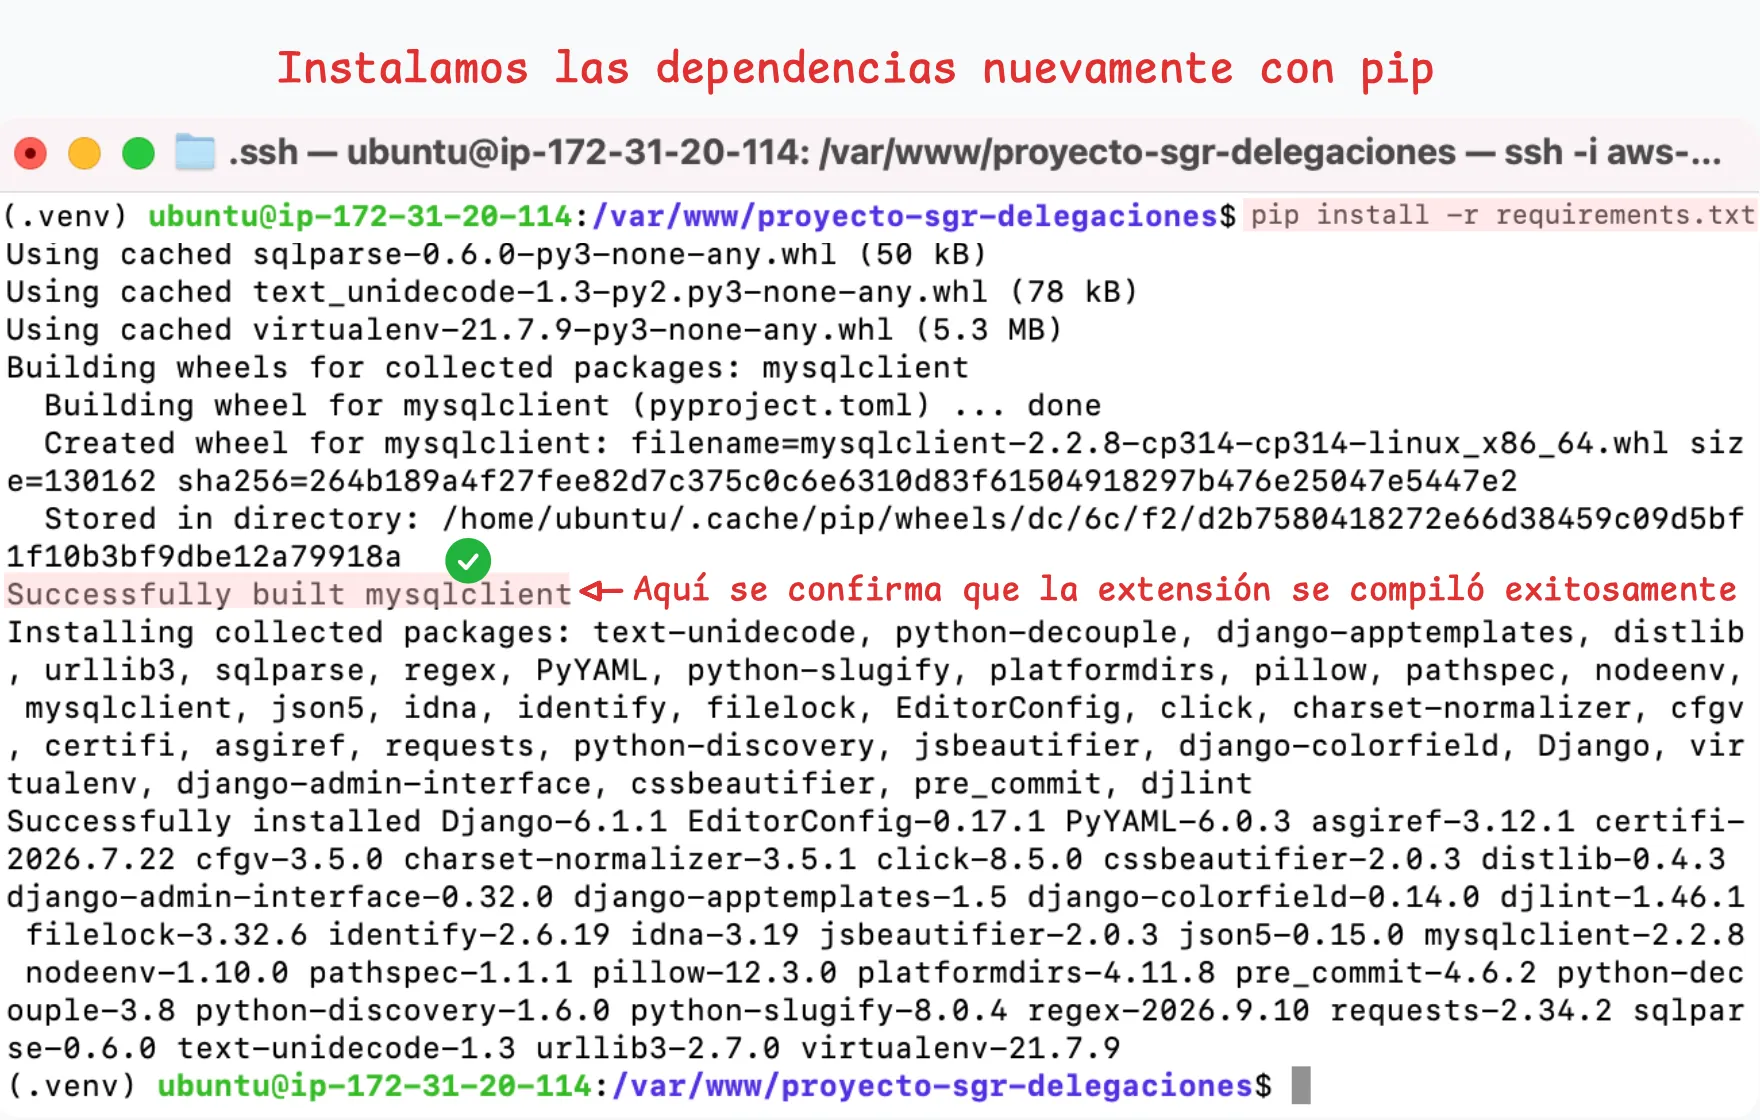
Figura 30. Confirmar la instalación de las dependencias
Veriricar almacenamiento
Durante la instalación de dependencias y paquetes, es recomendable revisar periódicamente el espacio disponible ejecutando:
df -h /
ubuntu@ip-172-31-4-218$ df -h /
Filesystem      Size  Used Avail Use% Mounted on
/dev/root       6.7G  3.2G  3.5G  48% /
Para estar consciente del espacio de almacenamiento disponible.
13. Instalación de MySQL
Como la aplicación Django y la base de datos se ejecutarán en la misma instancia EC2, instalaremos MySQL Server directamente dentro del servidor de ubuntu.
En los repositorios de Ubuntu Server podemos encontrar MySQL Server, ya que se encuentra disponible directamente en los repositorios oficiales de la distribución. Para instalarlo, ejecutamos:
sudo apt install mysql-server -y
ubuntu@ip-172-31-4-218:~$ sudo apt install mysql-server -y
The following package was automatically installed and is no longer required:
pollinate
Use 'sudo apt autoremove' to remove it.

Installing:
mysql-server

Installing dependencies:
libcgi-fast-perl       libfcgi0t64              libhttp-message-perl     libtimedate-perl
libcgi-pm-perl         libgoogle-perftools4t64  libio-html-perl          liburi-perl
libclone-perl          libhtml-parser-perl      liblwp-mediatypes-perl   mysql-client
libencode-locale-perl  libhtml-tagset-perl      libmecab2                mysql-client-core
libfcgi-bin            libhtml-template-perl    libprotobuf-lite32t64    mysql-server-core
libfcgi-perl           libhttp-date-perl        libtcmalloc-minimal4t64

Suggested packages:
libdata-dump-perl        libio-compress-brotli-perl  libmime-base32-perl  libwww-perl
libipc-sharedcache-perl  libbusiness-isbn-perl       libregexp-ipv6-perl

Recommended packages:
mecab-ipadic-utf

Summary:
Upgrading: 0, Installing: 24, Removing: 0, Not Upgrading: 3
Download size: 24.7 MB
Space needed: 183 MB / 3729 MB available

Get:1 http://us-east-1.ec2.archive.ubuntu.com/ubuntu resolute/main amd64v3 libtcmalloc-minimal4t64 amd64 2.18.1-1 [138 kB]
Get:2 http://us-east-1.ec2.archive.ubuntu.com/ubuntu resolute/main amd64v3 libgoogle-perftools4t64 amd64 2.18.1-1 [200 kB]
Get:3 http://us-east-1.ec2.archive.ubuntu.com/ubuntu resolute-updates/main amd64v3 mysql-client-core amd64 8.4.11-0ubuntu0.26.04.1 [2011 kB]
Get:4 http://us-east-1.ec2.archive.ubuntu.com/ubuntu resolute-updates/main amd64v3 mysql-client amd64 8.4.11-0ubuntu0.26.04.1 [9142 B]
Get:5 http://us-east-1.ec2.archive.ubuntu.com/ubuntu resolute/main amd64v3 libmecab2 amd64 0.996-15.1build4 [208 kB]
Get:6 http://us-east-1.ec2.archive.ubuntu.com/ubuntu resolute/main amd64v3 libprotobuf-lite32t64 amd64 3.21.12-15ubuntu1 [253 kB]
Get:7 http://us-east-1.ec2.archive.ubuntu.com/ubuntu resolute-updates/main amd64v3 mysql-server-core amd64 8.4.11-0ubuntu0.26.04.1 [19.5 MB]
Get:8 http://us-east-1.ec2.archive.ubuntu.com/ubuntu resolute-updates/main amd64v3 mysql-server amd64 8.4.11-0ubuntu0.26.04.1 [1595 kB]
Get:9 http://us-east-1.ec2.archive.ubuntu.com/ubuntu resolute/main amd64v3 libhtml-tagset-perl all 3.24-1 [14.1 kB]
Get:10 http://us-east-1.ec2.archive.ubuntu.com/ubuntu resolute/main amd64v3 liburi-perl all 5.34-2build1 [100 kB]
Get:11 http://us-east-1.ec2.archive.ubuntu.com/ubuntu resolute-updates/main amd64v3 libhtml-parser-perl amd64 3.83-1ubuntu0.1 [85.7 kB]
Get:12 http://us-east-1.ec2.archive.ubuntu.com/ubuntu resolute/main amd64v3 libcgi-pm-perl all 4.71-1build1 [185 kB]
Get:13 http://us-east-1.ec2.archive.ubuntu.com/ubuntu resolute/main amd64v3 libfcgi0t64 amd64 2.4.5-0.1build2 [28.0 kB]
Get:14 http://us-east-1.ec2.archive.ubuntu.com/ubuntu resolute/main amd64v3 libfcgi-perl amd64 0.82+ds-3build3 [21.9 kB]
Get:15 http://us-east-1.ec2.archive.ubuntu.com/ubuntu resolute/main amd64v3 libcgi-fast-perl all 1:2.17-1 [10.3 kB]
Get:16 http://us-east-1.ec2.archive.ubuntu.com/ubuntu resolute/main amd64v3 libclone-perl amd64 0.47-1 [10.8 kB]
Get:17 http://us-east-1.ec2.archive.ubuntu.com/ubuntu resolute/main amd64v3 libencode-locale-perl all 1.05-3 [11.6 kB]
Get:18 http://us-east-1.ec2.archive.ubuntu.com/ubuntu resolute/main amd64v3 libfcgi-bin amd64 2.4.5-0.1build2 [12.2 kB]
Get:19 http://us-east-1.ec2.archive.ubuntu.com/ubuntu resolute/main amd64v3 libhtml-template-perl all 2.97-2build1 [58.3 kB]
Get:20 http://us-east-1.ec2.archive.ubuntu.com/ubuntu resolute/main amd64v3 libtimedate-perl all 2.3300-2 [34.0 kB]
Get:21 http://us-east-1.ec2.archive.ubuntu.com/ubuntu resolute-updates/main amd64v3 libhttp-date-perl all 6.06-1ubuntu0.26.04.1 [10.6 kB]
Get:22 http://us-east-1.ec2.archive.ubuntu.com/ubuntu resolute/main amd64v3 libio-html-perl all 1.004-3 [15.9 kB]
Get:23 http://us-east-1.ec2.archive.ubuntu.com/ubuntu resolute/main amd64v3 liblwp-mediatypes-perl all 6.04-2 [20.1 kB]
Get:24 http://us-east-1.ec2.archive.ubuntu.com/ubuntu resolute/main amd64v3 libhttp-message-perl all 7.01-1ubuntu1 [76.1 kB]
Fetched 24.7 MB in 0s (83.0 MB/s)
Preconfiguring packages ...
Selecting previously unselected package libtcmalloc-minimal4t64:amd64.
(Reading database ... 132002 files and directories currently installed.)
Preparing to unpack .../00-libtcmalloc-minimal4t64_2.18.1-1_amd64v3.deb ...
Unpacking libtcmalloc-minimal4t64:amd64 (2.18.1-1) ...
Selecting previously unselected package libgoogle-perftools4t64:amd64.
Preparing to unpack .../01-libgoogle-perftools4t64_2.18.1-1_amd64v3.deb ...
Unpacking libgoogle-perftools4t64:amd64 (2.18.1-1) ...
Selecting previously unselected package mysql-client-core.
Preparing to unpack .../02-mysql-client-core_8.4.11-0ubuntu0.26.04.1_amd64v3.deb ...
Unpacking mysql-client-core (8.4.11-0ubuntu0.26.04.1) ...
Selecting previously unselected package mysql-client.
Preparing to unpack .../03-mysql-client_8.4.11-0ubuntu0.26.04.1_amd64v3.deb ...
Unpacking mysql-client (8.4.11-0ubuntu0.26.04.1) ...
Selecting previously unselected package libmecab2:amd64.
Preparing to unpack .../04-libmecab2_0.996-15.1build4_amd64v3.deb ...
Unpacking libmecab2:amd64 (0.996-15.1build4) ...
Selecting previously unselected package libprotobuf-lite32t64:amd64.
Preparing to unpack .../05-libprotobuf-lite32t64_3.21.12-15ubuntu1_amd64v3.deb ...
Unpacking libprotobuf-lite32t64:amd64 (3.21.12-15ubuntu1) ...
Selecting previously unselected package mysql-server-core.
Preparing to unpack .../06-mysql-server-core_8.4.11-0ubuntu0.26.04.1_amd64v3.deb ...
Unpacking mysql-server-core (8.4.11-0ubuntu0.26.04.1) ...
Selecting previously unselected package mysql-server.
Preparing to unpack .../07-mysql-server_8.4.11-0ubuntu0.26.04.1_amd64v3.deb ...
Unpacking mysql-server (8.4.11-0ubuntu0.26.04.1) ...
Selecting previously unselected package libhtml-tagset-perl.
Preparing to unpack .../08-libhtml-tagset-perl_3.24-1_all.deb ...
Unpacking libhtml-tagset-perl (3.24-1) ...
Selecting previously unselected package liburi-perl.
Preparing to unpack .../09-liburi-perl_5.34-2build1_all.deb ...
Unpacking liburi-perl (5.34-2build1) ...
Selecting previously unselected package libhtml-parser-perl:amd64.
Preparing to unpack .../10-libhtml-parser-perl_3.83-1ubuntu0.1_amd64v3.deb ...
Unpacking libhtml-parser-perl:amd64 (3.83-1ubuntu0.1) ...
Selecting previously unselected package libcgi-pm-perl.
Preparing to unpack .../11-libcgi-pm-perl_4.71-1build1_all.deb ...
Unpacking libcgi-pm-perl (4.71-1build1) ...
Selecting previously unselected package libfcgi0t64:amd64.
Preparing to unpack .../12-libfcgi0t64_2.4.5-0.1build2_amd64v3.deb ...
Unpacking libfcgi0t64:amd64 (2.4.5-0.1build2) ...
Selecting previously unselected package libfcgi-perl.
Preparing to unpack .../13-libfcgi-perl_0.82+ds-3build3_amd64v3.deb ...
Unpacking libfcgi-perl (0.82+ds-3build3) ...
Selecting previously unselected package libcgi-fast-perl.
Preparing to unpack .../14-libcgi-fast-perl_1%3a2.17-1_all.deb ...
Unpacking libcgi-fast-perl (1:2.17-1) ...
Selecting previously unselected package libclone-perl:amd64.
Preparing to unpack .../15-libclone-perl_0.47-1_amd64v3.deb ...
Unpacking libclone-perl:amd64 (0.47-1) ...
Selecting previously unselected package libencode-locale-perl.
Preparing to unpack .../16-libencode-locale-perl_1.05-3_all.deb ...
Unpacking libencode-locale-perl (1.05-3) ...
Selecting previously unselected package libfcgi-bin.
Preparing to unpack .../17-libfcgi-bin_2.4.5-0.1build2_amd64v3.deb ...
Unpacking libfcgi-bin (2.4.5-0.1build2) ...
Selecting previously unselected package libhtml-template-perl.
Preparing to unpack .../18-libhtml-template-perl_2.97-2build1_all.deb ...
Unpacking libhtml-template-perl (2.97-2build1) ...
Selecting previously unselected package libtimedate-perl.
Preparing to unpack .../19-libtimedate-perl_2.3300-2_all.deb ...
Unpacking libtimedate-perl (2.3300-2) ...
Selecting previously unselected package libhttp-date-perl.
Preparing to unpack .../20-libhttp-date-perl_6.06-1ubuntu0.26.04.1_all.deb ...
Unpacking libhttp-date-perl (6.06-1ubuntu0.26.04.1) ...
Selecting previously unselected package libio-html-perl.
Preparing to unpack .../21-libio-html-perl_1.004-3_all.deb ...
Unpacking libio-html-perl (1.004-3) ...
Selecting previously unselected package liblwp-mediatypes-perl.
Preparing to unpack .../22-liblwp-mediatypes-perl_6.04-2_all.deb ...
Unpacking liblwp-mediatypes-perl (6.04-2) ...
Selecting previously unselected package libhttp-message-perl.
Preparing to unpack .../23-libhttp-message-perl_7.01-1ubuntu1_all.deb ...
Unpacking libhttp-message-perl (7.01-1ubuntu1) ...
Setting up libprotobuf-lite32t64:amd64 (3.21.12-15ubuntu1) ...
Setting up libmecab2:amd64 (0.996-15.1build4) ...
Setting up libclone-perl:amd64 (0.47-1) ...
Setting up libfcgi0t64:amd64 (2.4.5-0.1build2) ...
Setting up libhtml-tagset-perl (3.24-1) ...
Setting up liblwp-mediatypes-perl (6.04-2) ...
Setting up libfcgi-bin (2.4.5-0.1build2) ...
Setting up libencode-locale-perl (1.05-3) ...
Setting up libio-html-perl (1.004-3) ...
Setting up libtcmalloc-minimal4t64:amd64 (2.18.1-1) ...
Setting up libtimedate-perl (2.3300-2) ...
Setting up libfcgi-perl (0.82+ds-3build3) ...
Setting up liburi-perl (5.34-2build1) ...
Setting up libhttp-date-perl (6.06-1ubuntu0.26.04.1) ...
Setting up libgoogle-perftools4t64:amd64 (2.18.1-1) ...
Setting up mysql-server-core (8.4.11-0ubuntu0.26.04.1) ...
Setting up mysql-client-core (8.4.11-0ubuntu0.26.04.1) ...
Setting up libhtml-parser-perl:amd64 (3.83-1ubuntu0.1) ...
Setting up libhttp-message-perl (7.01-1ubuntu1) ...
Setting up mysql-client (8.4.11-0ubuntu0.26.04.1) ...
Setting up libcgi-pm-perl (4.71-1build1) ...
Setting up libhtml-template-perl (2.97-2build1) ...
Setting up mysql-server (8.4.11-0ubuntu0.26.04.1) ...
update-alternatives: using /etc/mysql/mysql.cnf to provide /etc/mysql/my.cnf (my.cnf) in auto mode
Renaming removed key_buffer and myisam-recover options (if present)
Created symlink '/etc/systemd/system/multi-user.target.wants/mysql.service' → '/usr/lib/systemd/system/mysql.service'.
Setting up libcgi-fast-perl (1:2.17-1) ...
Processing triggers for man-db (2.13.1-1build1) ...
Processing triggers for libc-bin (2.43-2ubuntu2.4) ...
Scanning processes...
Scanning linux images...

Running kernel seems to be up-to-date.

No services need to be restarted.

No containers need to be restarted.

No user sessions are running outdated binaries.

No VM guests are running outdated hypervisor (qemu) binaries on this host.
Durante la instalación, apt descargará e instalará MySQL Server junto con las dependencias necesarias.
Una vez finalizada la instalación, podemos comprobar que el servicio se encuentre activo:
sudo systemctl status mysql
ubuntu@ip-172-31-4-218:~$ sudo systemctl status mysql
● mysql.service - MySQL Community Server
    Loaded: loaded (/usr/lib/systemd/system/mysql.service; enabled; preset: enabled)
    Active: active (running) since Sat 2026-09-26 20:51:51 UTC; 8min ago
Invocation: f48554ae73a143d6bda51841dbd7f67f
    Process: 2977 ExecStartPre=/usr/share/mysql/mysql-systemd-start pre (code=exited, status=0/SUCC>
Main PID: 2987 (mysqld)
    Status: "Server is operational"
    Tasks: 34 (limit: 627)
    Memory: 479.2M (peak: 484.6M)
        CPU: 4.762s
    CGroup: /system.slice/mysql.service
            └─2987 /usr/sbin/mysqld

Sep 26 20:51:49 ip-172-31-4-218 systemd[1]: Starting mysql.service - MySQL Community Server...
Sep 26 20:51:51 ip-172-31-4-218 systemd[1]: Started mysql.service - MySQL Community Server.
Si aparece como active (running), MySQL se encuentra funcionando correctamente y listo para poder conectarse.
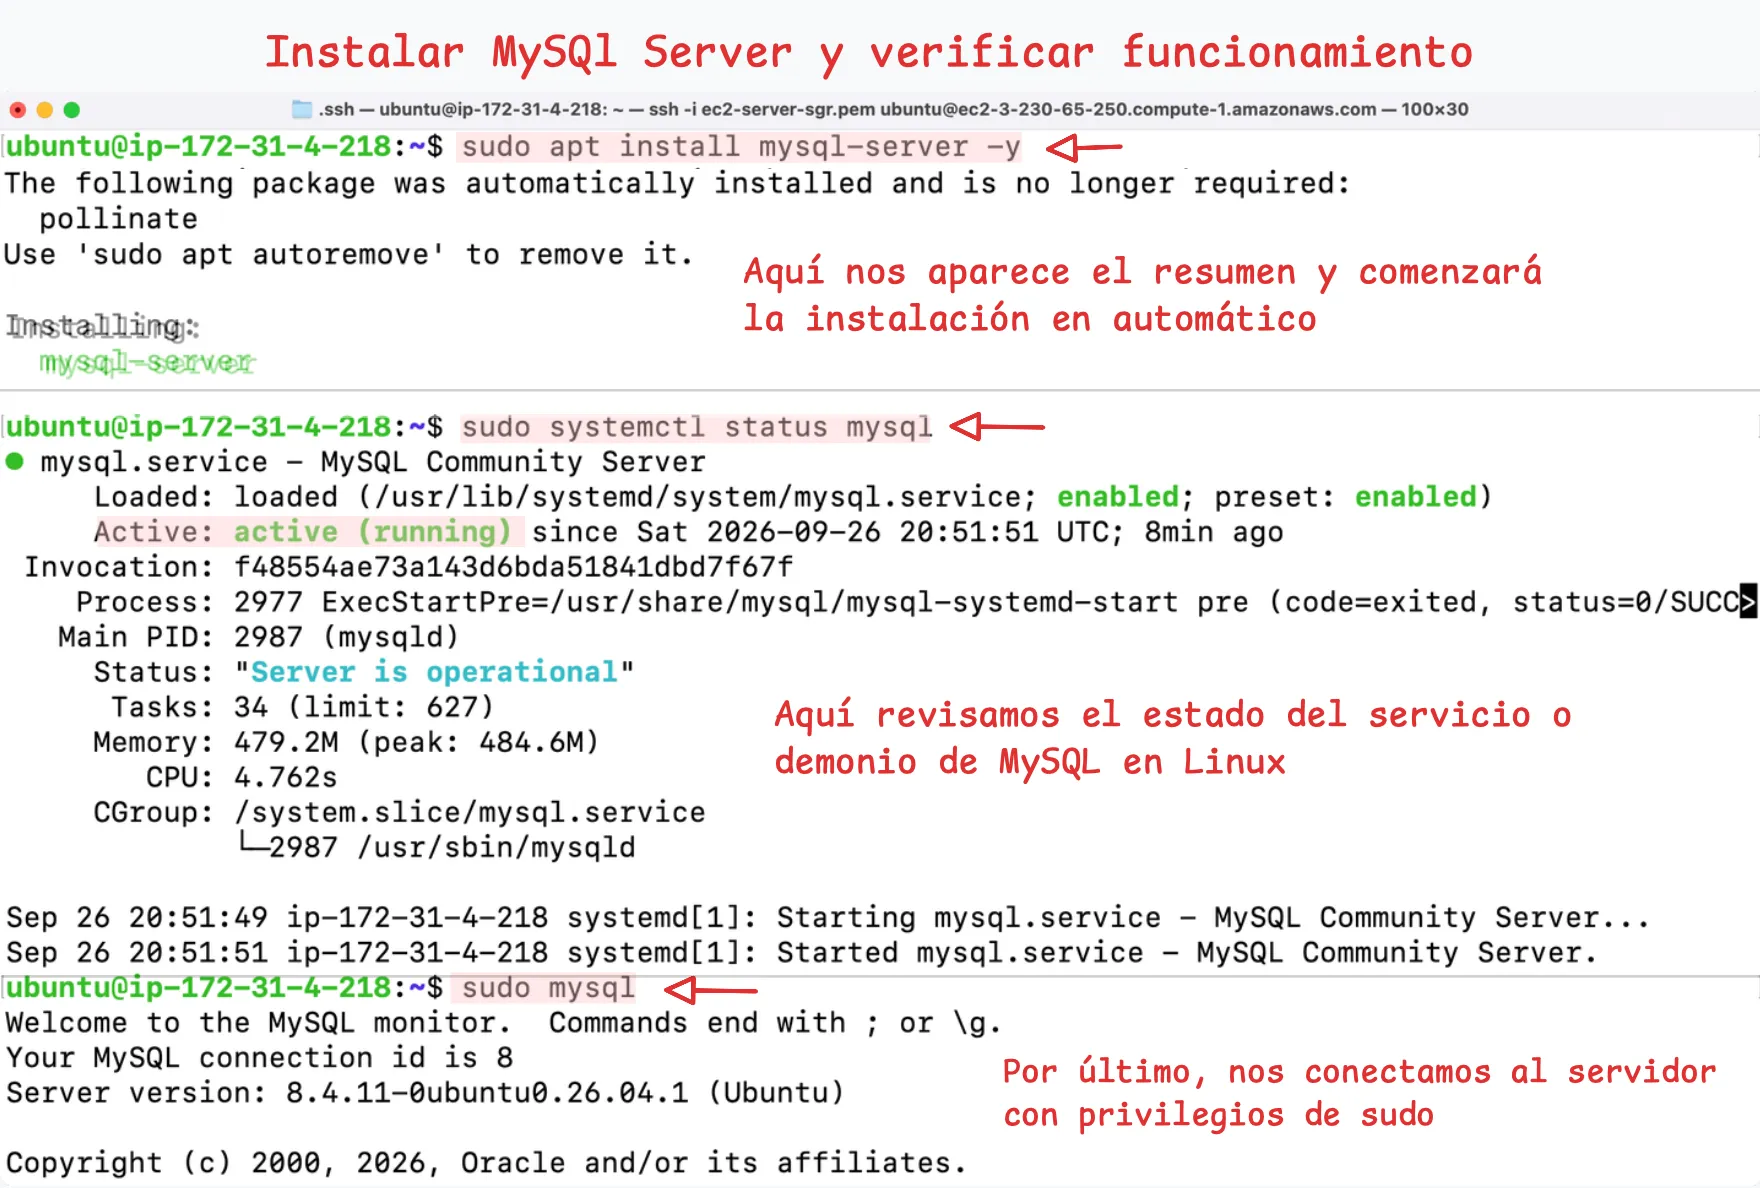
Figura 31. Instalar MySQL Server y verificar funcionamiento
14. Configuración de la base de datos y usuario
Para conectar la aplicación Django con MySQL, primero crearemos un usuario y luego la base de datos que utilizará el sistema. Posteriormente, asignaremos al usuario todos los privilegios sobre la base de datos creada.
Primero nos conectamos a MySQL:
sudo mysql
Luego, ejecutamos los siguientes comandos:
CREATE USER 'sgr_user'@'localhost' IDENTIFIED BY 'TU_CONTRASEÑA_SEGURA';

CREATE DATABASE sgr_db

GRANT ALL PRIVILEGES ON sgr_db.* TO 'sgr_user'@'localhost';

FLUSH PRIVILEGES;
ubuntu@ip-172-31-4-218:~$ sudo mysql
Welcome to the MySQL monitor.  Commands end with ; or \g.
Your MySQL connection id is 9
Server version: 8.4.11-0ubuntu0.26.04.1 (Ubuntu)

Copyright (c) 2000, 2026, Oracle and/or its affiliates.

Oracle is a registered trademark of Oracle Corporation and/or its
affiliates. Other names may be trademarks of their respective
owners.

Type 'help;' or '\h' for help. Type '\c' to clear the current input statement.

mysql> CREATE USER 'sgr_user'@'localhost' IDENTIFIED BY 'proPassword123_';
Query OK, 0 rows affected (0.09 sec)

mysql> CREATE DATABASE sgr_db;
Query OK, 1 row affected (0.01 sec)

mysql> GRANT ALL PRIVILEGES ON sgr_db.* TO 'sgr_user'@'localhost';
Query OK, 0 rows affected (0.00 sec)

mysql> FLUSH PRIVILEGES;
Query OK, 0 rows affected (0.01 sec)

mysql> exit
Bye
De esta manera, la aplicación Django utilizará sgr_user para acceder exclusivamente a la base de datos sgr_db, manteniendo separado el acceso de la aplicación respecto del usuario administrativo root.
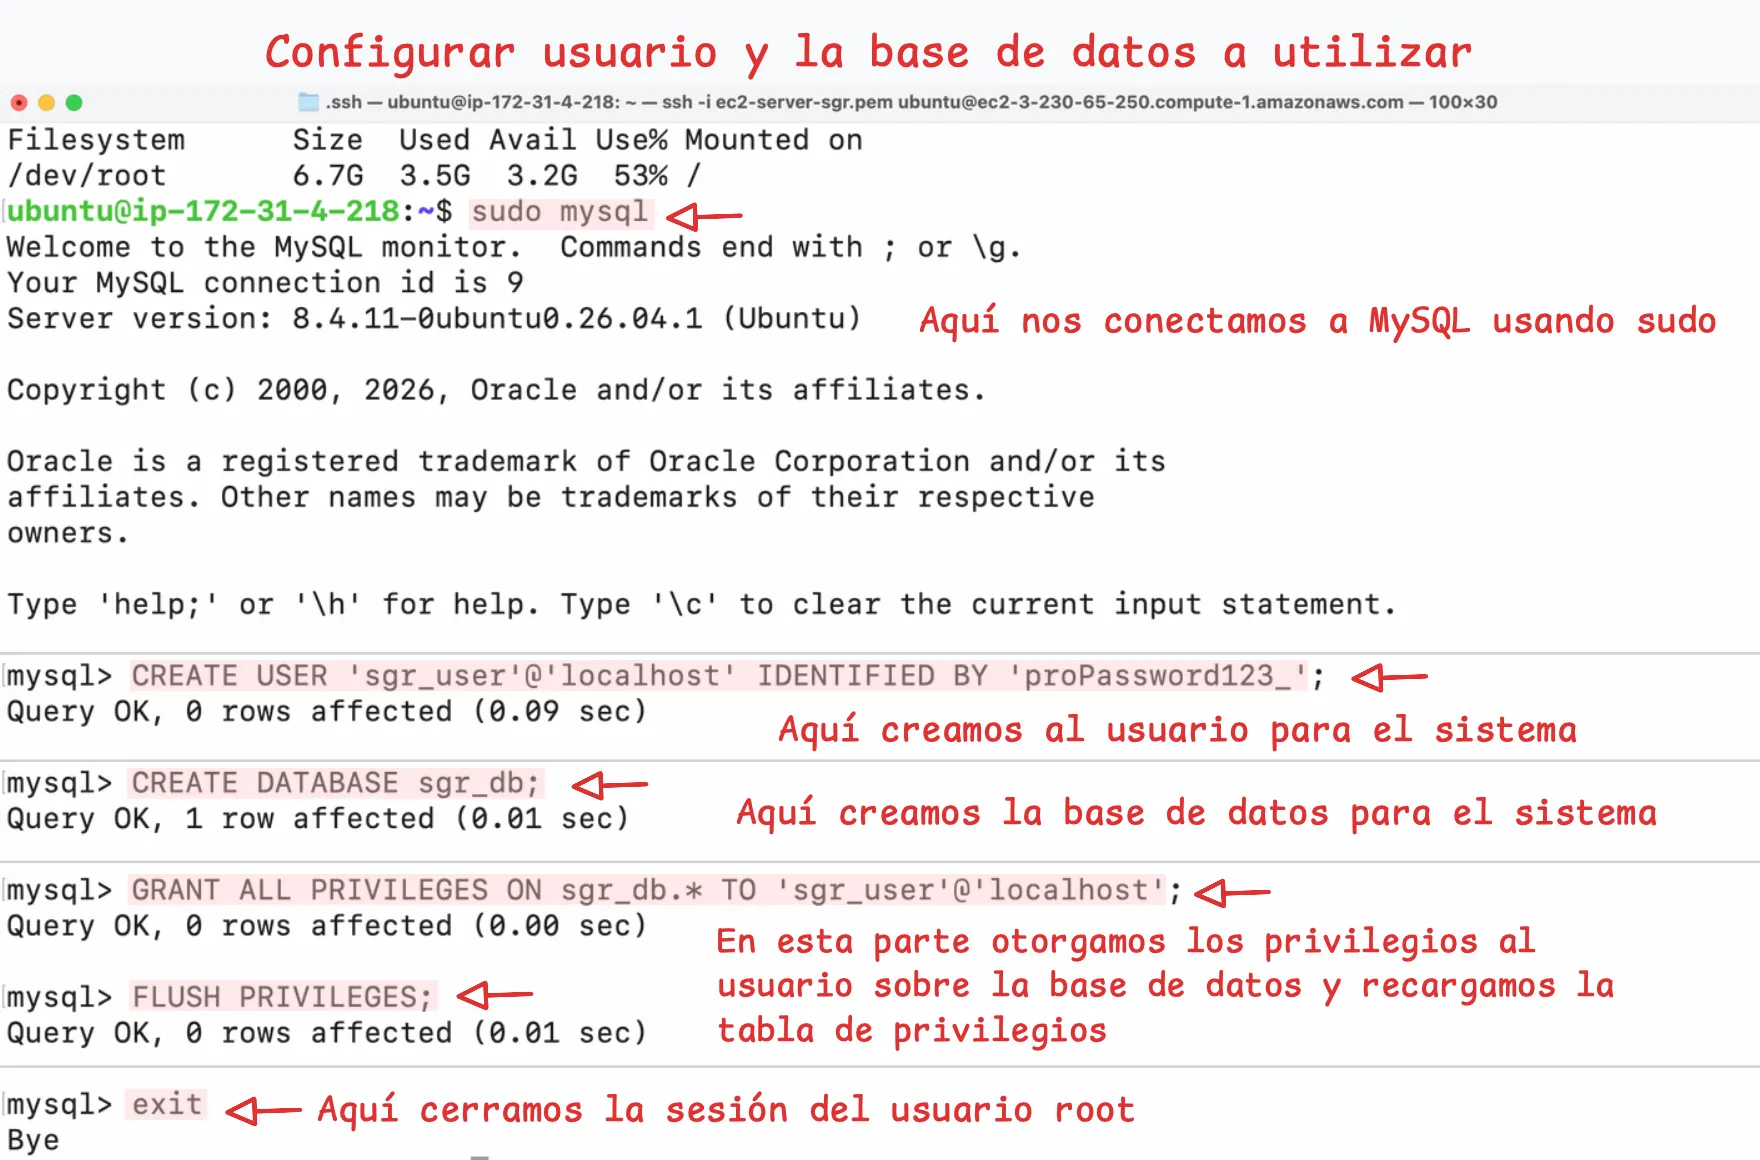
Figura 32. Configurar usuario y base de datos del sistema
15. Configurar variables de entorno
Ahora debemos comenzar a configurar las variables de entorno para continuar con la inicialización del proyecto y, posteriormente, ejecutar las migraciones para crear las tablas en la base de datos.
El proyecto incluye un archivo .env.example como referencia con las variables necesarias. A partir de este archivo, crearemos un archivo .env y configuraremos sus valores de acuerdo con el entorno del servidor.
(.venv) cp .env.example .env
(.venv) nano .env
ubuntu@ip-172-31-4-218:/var/www/proyecto-sgr-delegaciones$ nano .env
┌──────────────────────────────────────────────────┐
│ GNU nano 8.7.1          .env                   ◀ Archivo .env
├──────────────────────────────────────────────────┤
│ DB_NAME=sgr_db                                 ◀ Nombre de la base se datos
│ DB_USER=sgr_user                               ◀ Nombre del usuario de MySQL
│ DB_PASSWORD=proPassword123_                    ◀ Password del usuario de MySQL
│ DB_HOST=127.0.0.1                              ◀ Host de MySQL (dentro de ec2)
│ DB_PORT=3306                                   ◀ Puerto de MySQL (es predeterminado)
│ ENDPOINT_SERVICE_DRIVE=                        ◀ Servicio externo (opcional)
│ ALLOWED_HOSTS=localhost,127.0.0.1,3.230.65.250 ◀ Hosts permitidos para la aplicación
└──────────────────────────────────────────────────┘
| Combinaciones en Nano | |
|---|---|
| Ctrl+O | Guardar ( Enter para confirmar ) |
| Ctrl+X | Salir |
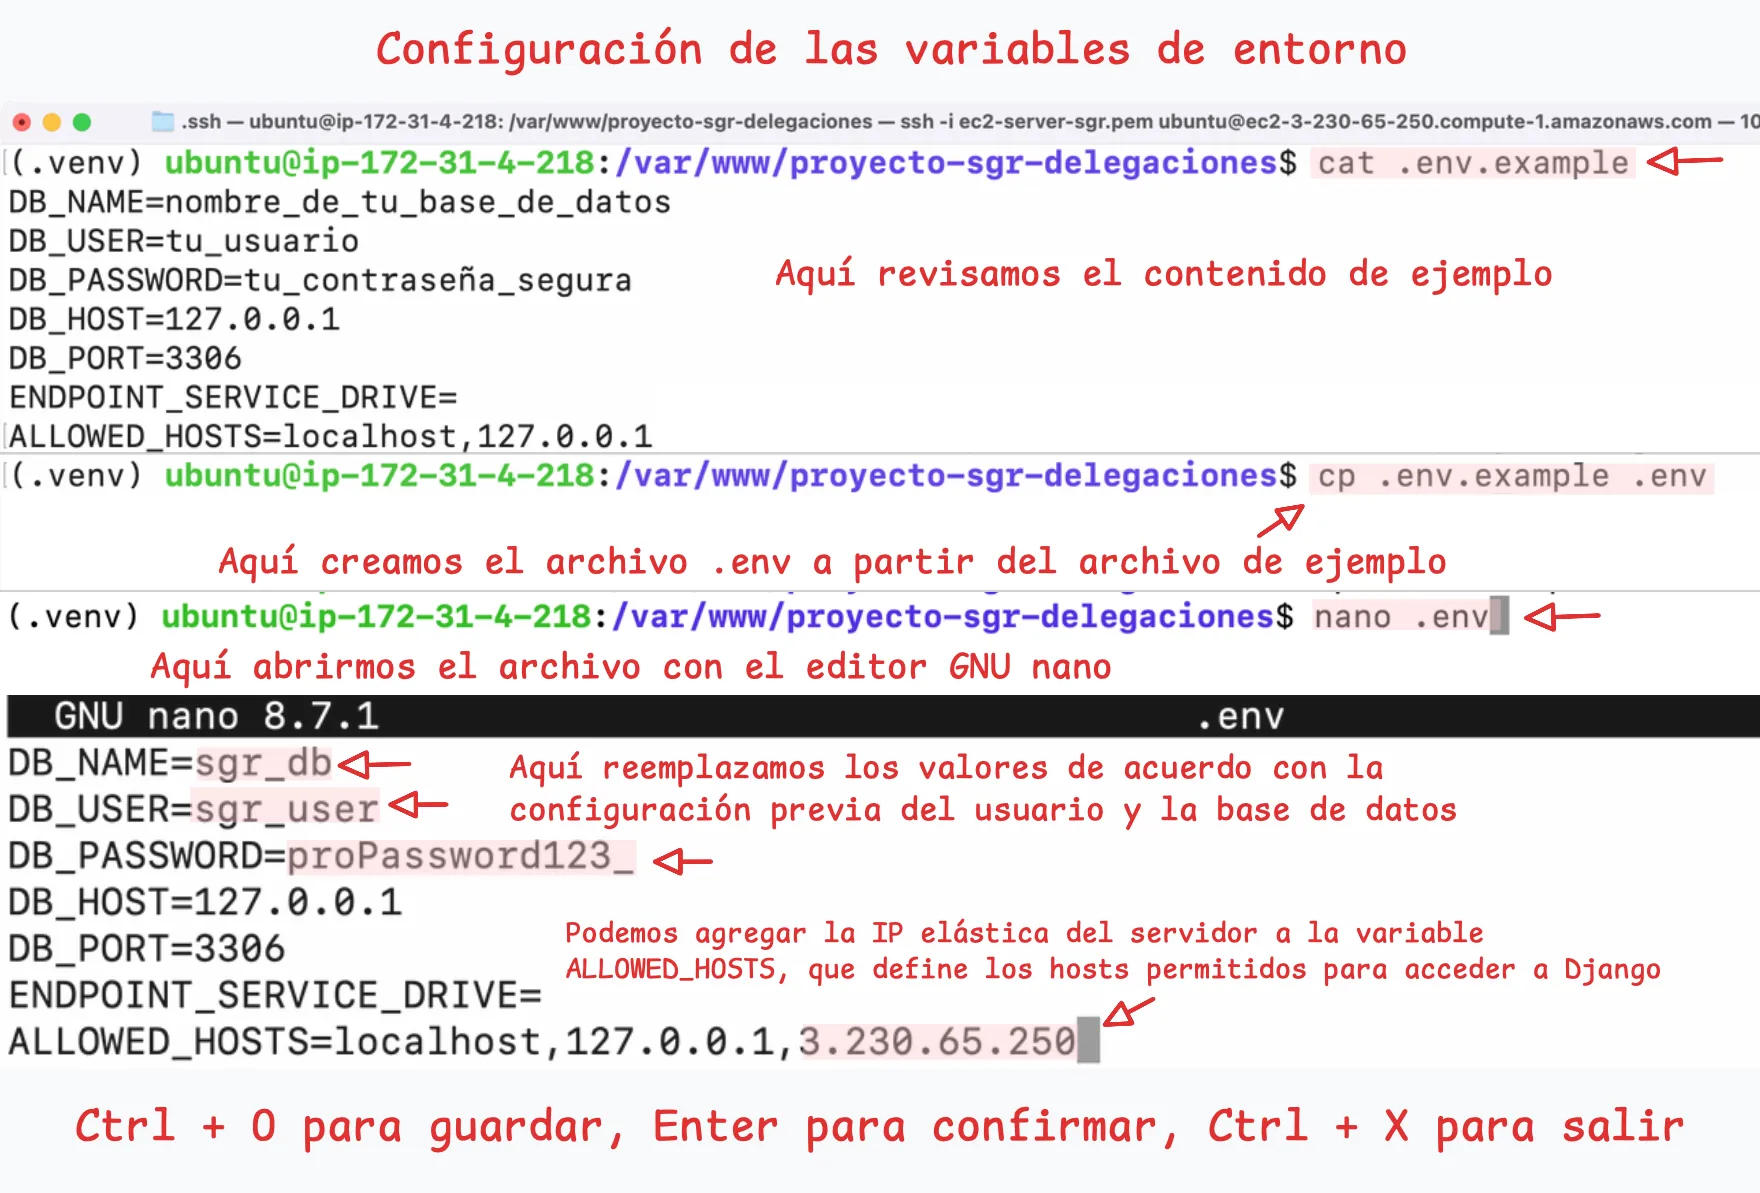
Figura 33. Configuración de las variables de entorno
16. Ejecutar las migraciones
Con las variables de entorno configuradas, ejecutamos las migraciones de Django para crear las tablas necesarias en la base de datos MySQL.
(.venv) python manage.py migrate
(.venv) ubuntu@ip-172-31-4-218:/var/www/proyecto-sgr-delegaciones$ python manage.py migrate
Operations to perform:
Apply all migrations: accounts, actividades, admin, admin_interface, auth, contenttypes, sessions
Running migrations:
Applying contenttypes.0001_initial... OK
Applying contenttypes.0002_remove_content_type_name... OK
Applying auth.0001_initial... OK
Applying auth.0002_alter_permission_name_max_length... OK
Applying auth.0003_alter_user_email_max_length... OK
Applying auth.0004_alter_user_username_opts... OK
Applying auth.0005_alter_user_last_login_null... OK
Applying auth.0006_require_contenttypes_0002... OK
Applying auth.0007_alter_validators_add_error_messages... OK
Applying auth.0008_alter_user_username_max_length... OK
Applying auth.0009_alter_user_last_name_max_length... OK
Applying auth.0010_alter_group_name_max_length... OK
Applying auth.0011_update_proxy_permissions... OK
Applying auth.0012_alter_user_first_name_max_length... OK
Applying accounts.0001_initial... OK
Applying accounts.0002_alter_user_managers_alter_user_email... OK
Applying accounts.0003_delegacion_user_delegacion... OK
Applying accounts.0004_cargo_alter_delegacion_options_user_cargo... OK
Applying accounts.0005_auto_20260914_1118... OK
Applying accounts.0006_alter_user_first_name_alter_user_last_name... OK
Applying accounts.0007_cargo_permisos... OK
Applying actividades.0001_initial... OK
Applying actividades.0002_activity_delete_actividad... OK
Applying actividades.0003_alter_activity_options... OK
Applying actividades.0004_alter_activity_options_alter_activity_description... OK
Applying actividades.0005_contact_remove_activity_is_active_activity_action_and_more... OK
Applying actividades.0006_contact_observations... OK
Applying admin.0001_initial... OK
Applying admin.0002_logentry_remove_auto_add... OK
Applying admin.0003_logentry_add_action_flag_choices... OK
Applying admin_interface.0001_initial... OK
Applying admin_interface.0002_add_related_modal... OK
Applying admin_interface.0003_add_logo_color... OK
Applying admin_interface.0004_rename_title_color... OK
Applying admin_interface.0005_add_recent_actions_visible... OK
Applying admin_interface.0006_bytes_to_str... OK
Applying admin_interface.0007_add_favicon... OK
Applying admin_interface.0008_change_related_modal_background_opacity_type... OK
Applying admin_interface.0009_add_enviroment... OK
Applying admin_interface.0010_add_localization... OK
Applying admin_interface.0011_add_environment_options... OK
Applying admin_interface.0012_update_verbose_names... OK
Applying admin_interface.0013_add_related_modal_close_button... OK
Applying admin_interface.0014_name_unique... OK
Applying admin_interface.0015_add_language_chooser_active... OK
Applying admin_interface.0016_add_language_chooser_display... OK
Applying admin_interface.0017_change_list_filter_dropdown... OK
Applying admin_interface.0018_theme_list_filter_sticky... OK
Applying admin_interface.0019_add_form_sticky... OK
Applying admin_interface.0020_module_selected_colors... OK
Applying admin_interface.0021_file_extension_validator... OK
Applying admin_interface.0022_add_logo_max_width_and_height... OK
Applying admin_interface.0023_theme_foldable_apps... OK
Applying admin_interface.0024_remove_theme_css... OK
Applying admin_interface.0025_theme_language_chooser_control... OK
Applying admin_interface.0026_theme_list_filter_highlight... OK
Applying admin_interface.0027_theme_list_filter_removal_links... OK
Applying admin_interface.0028_theme_show_fieldsets_as_tabs_and_more... OK
Applying admin_interface.0029_theme_css_generic_link_active_color... OK
Applying admin_interface.0030_theme_collapsible_stacked_inlines_and_more... OK
Applying admin_interface.0031_theme_form_actions_sticky... OK
Applying admin_interface.0032_alter_theme_defaults... OK
Applying sessions.0001_initial... OK
Este comando aplica las migraciones pendientes del proyecto y crea la estructura de la base de datos definida por los modelos de las aplicaciones.
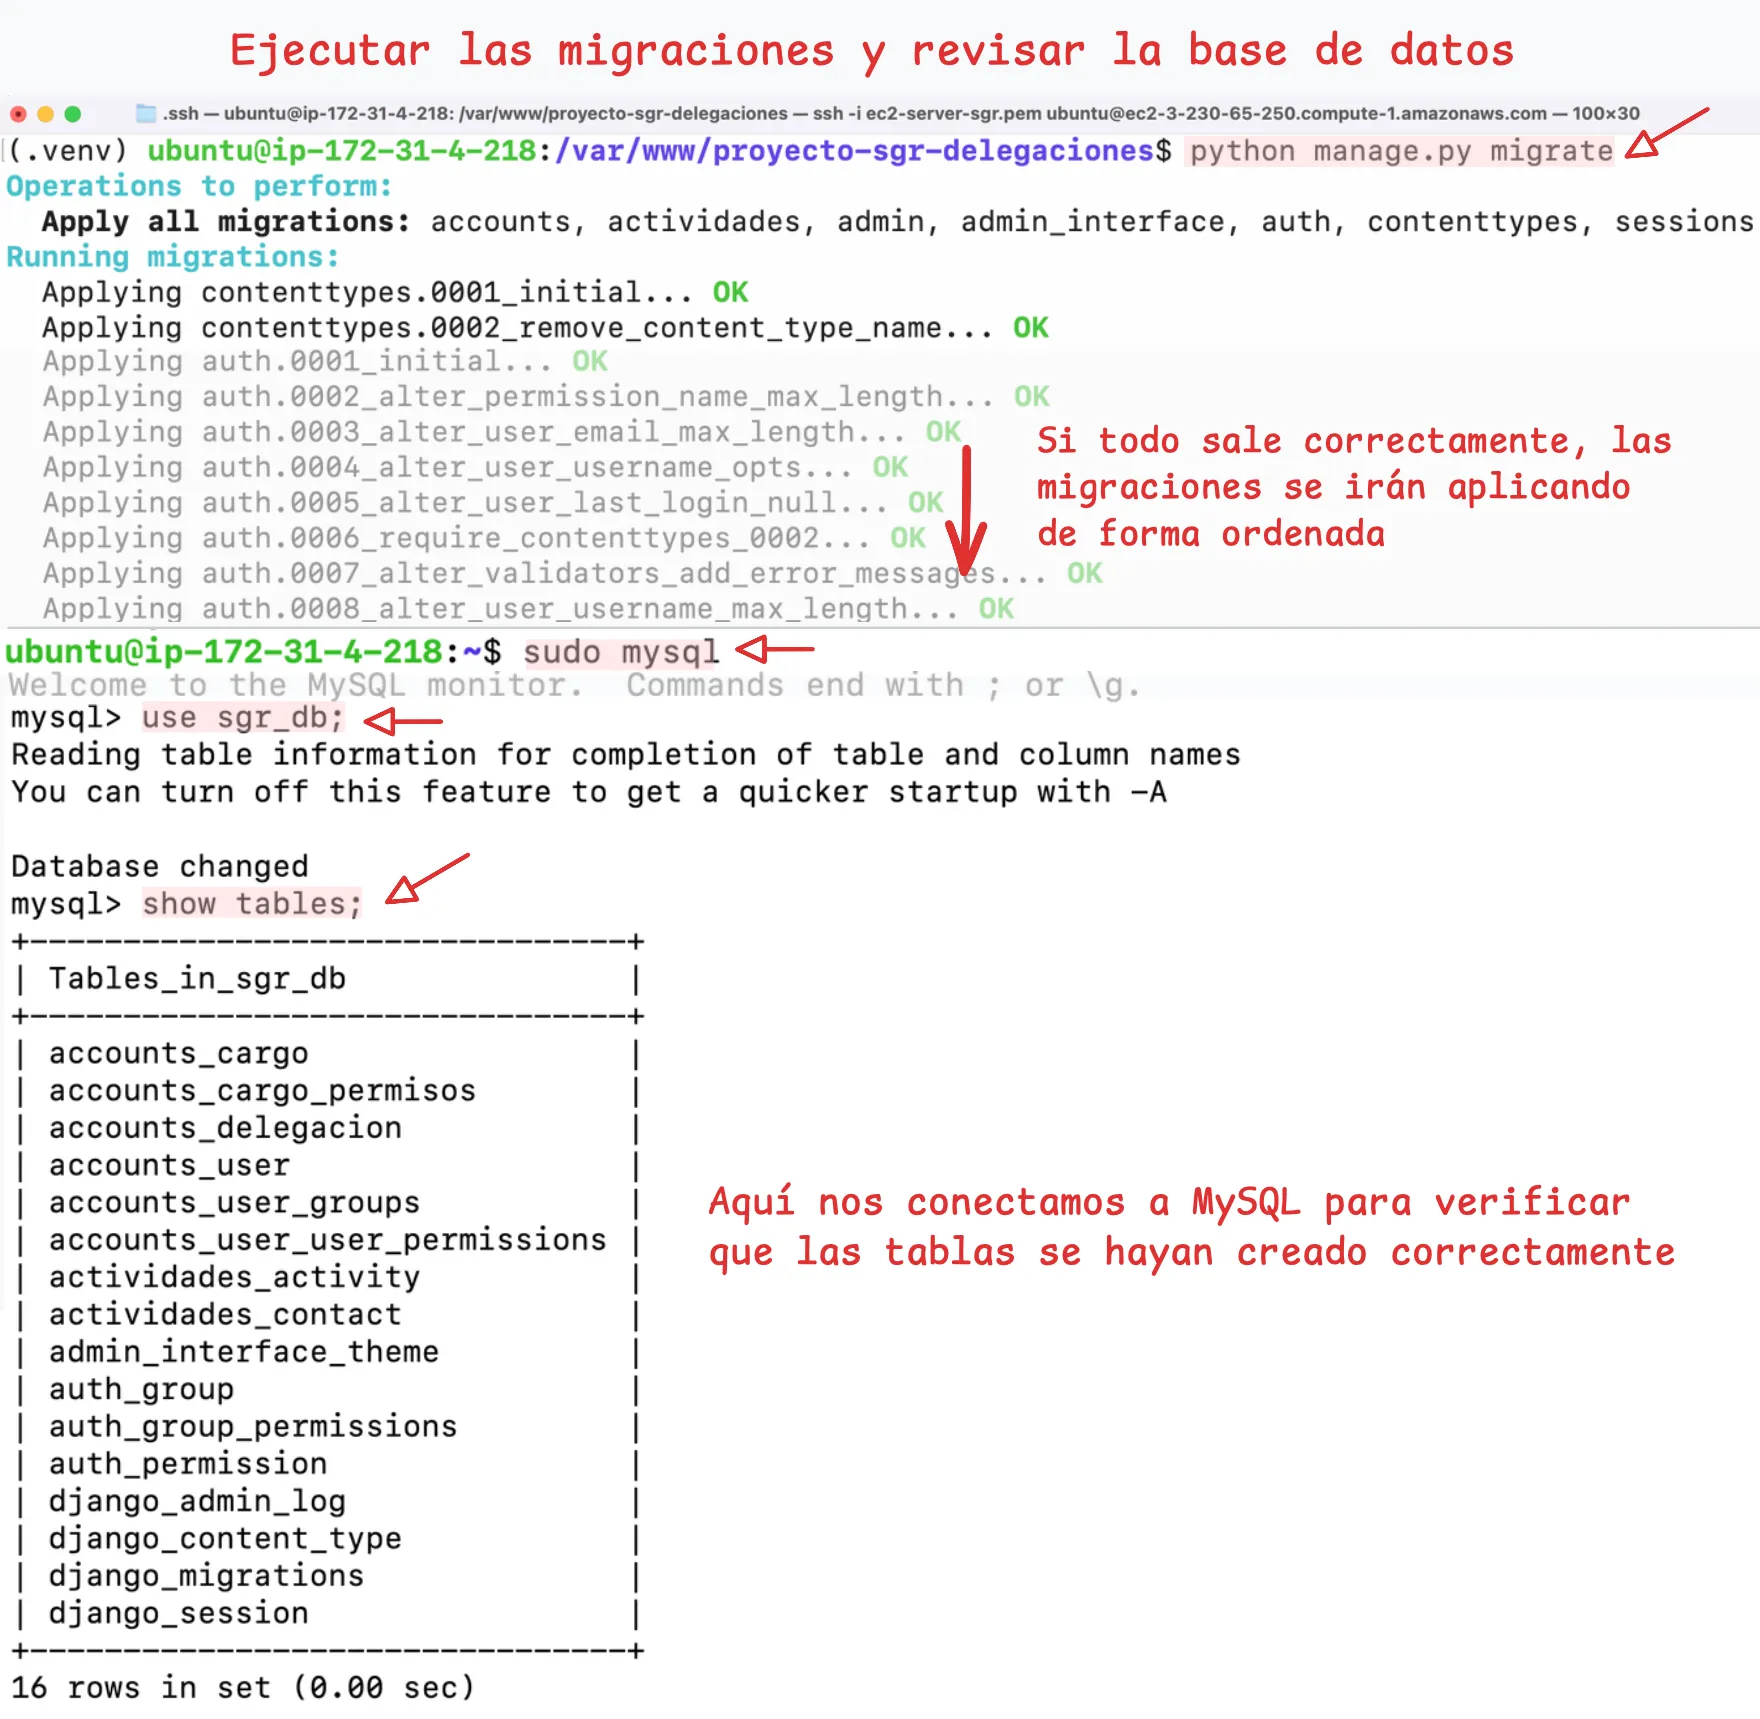
Figura 34. Ejecutar migraciones y verificar en MySQL
17. Probar la aplicación
Antes de probar la aplicación, debemos permitir el acceso al puerto 8000 desde el Grupo de Seguridad asociado a la instancia EC2. Para ello, agregamos una regla de entrada para dicho puerto.
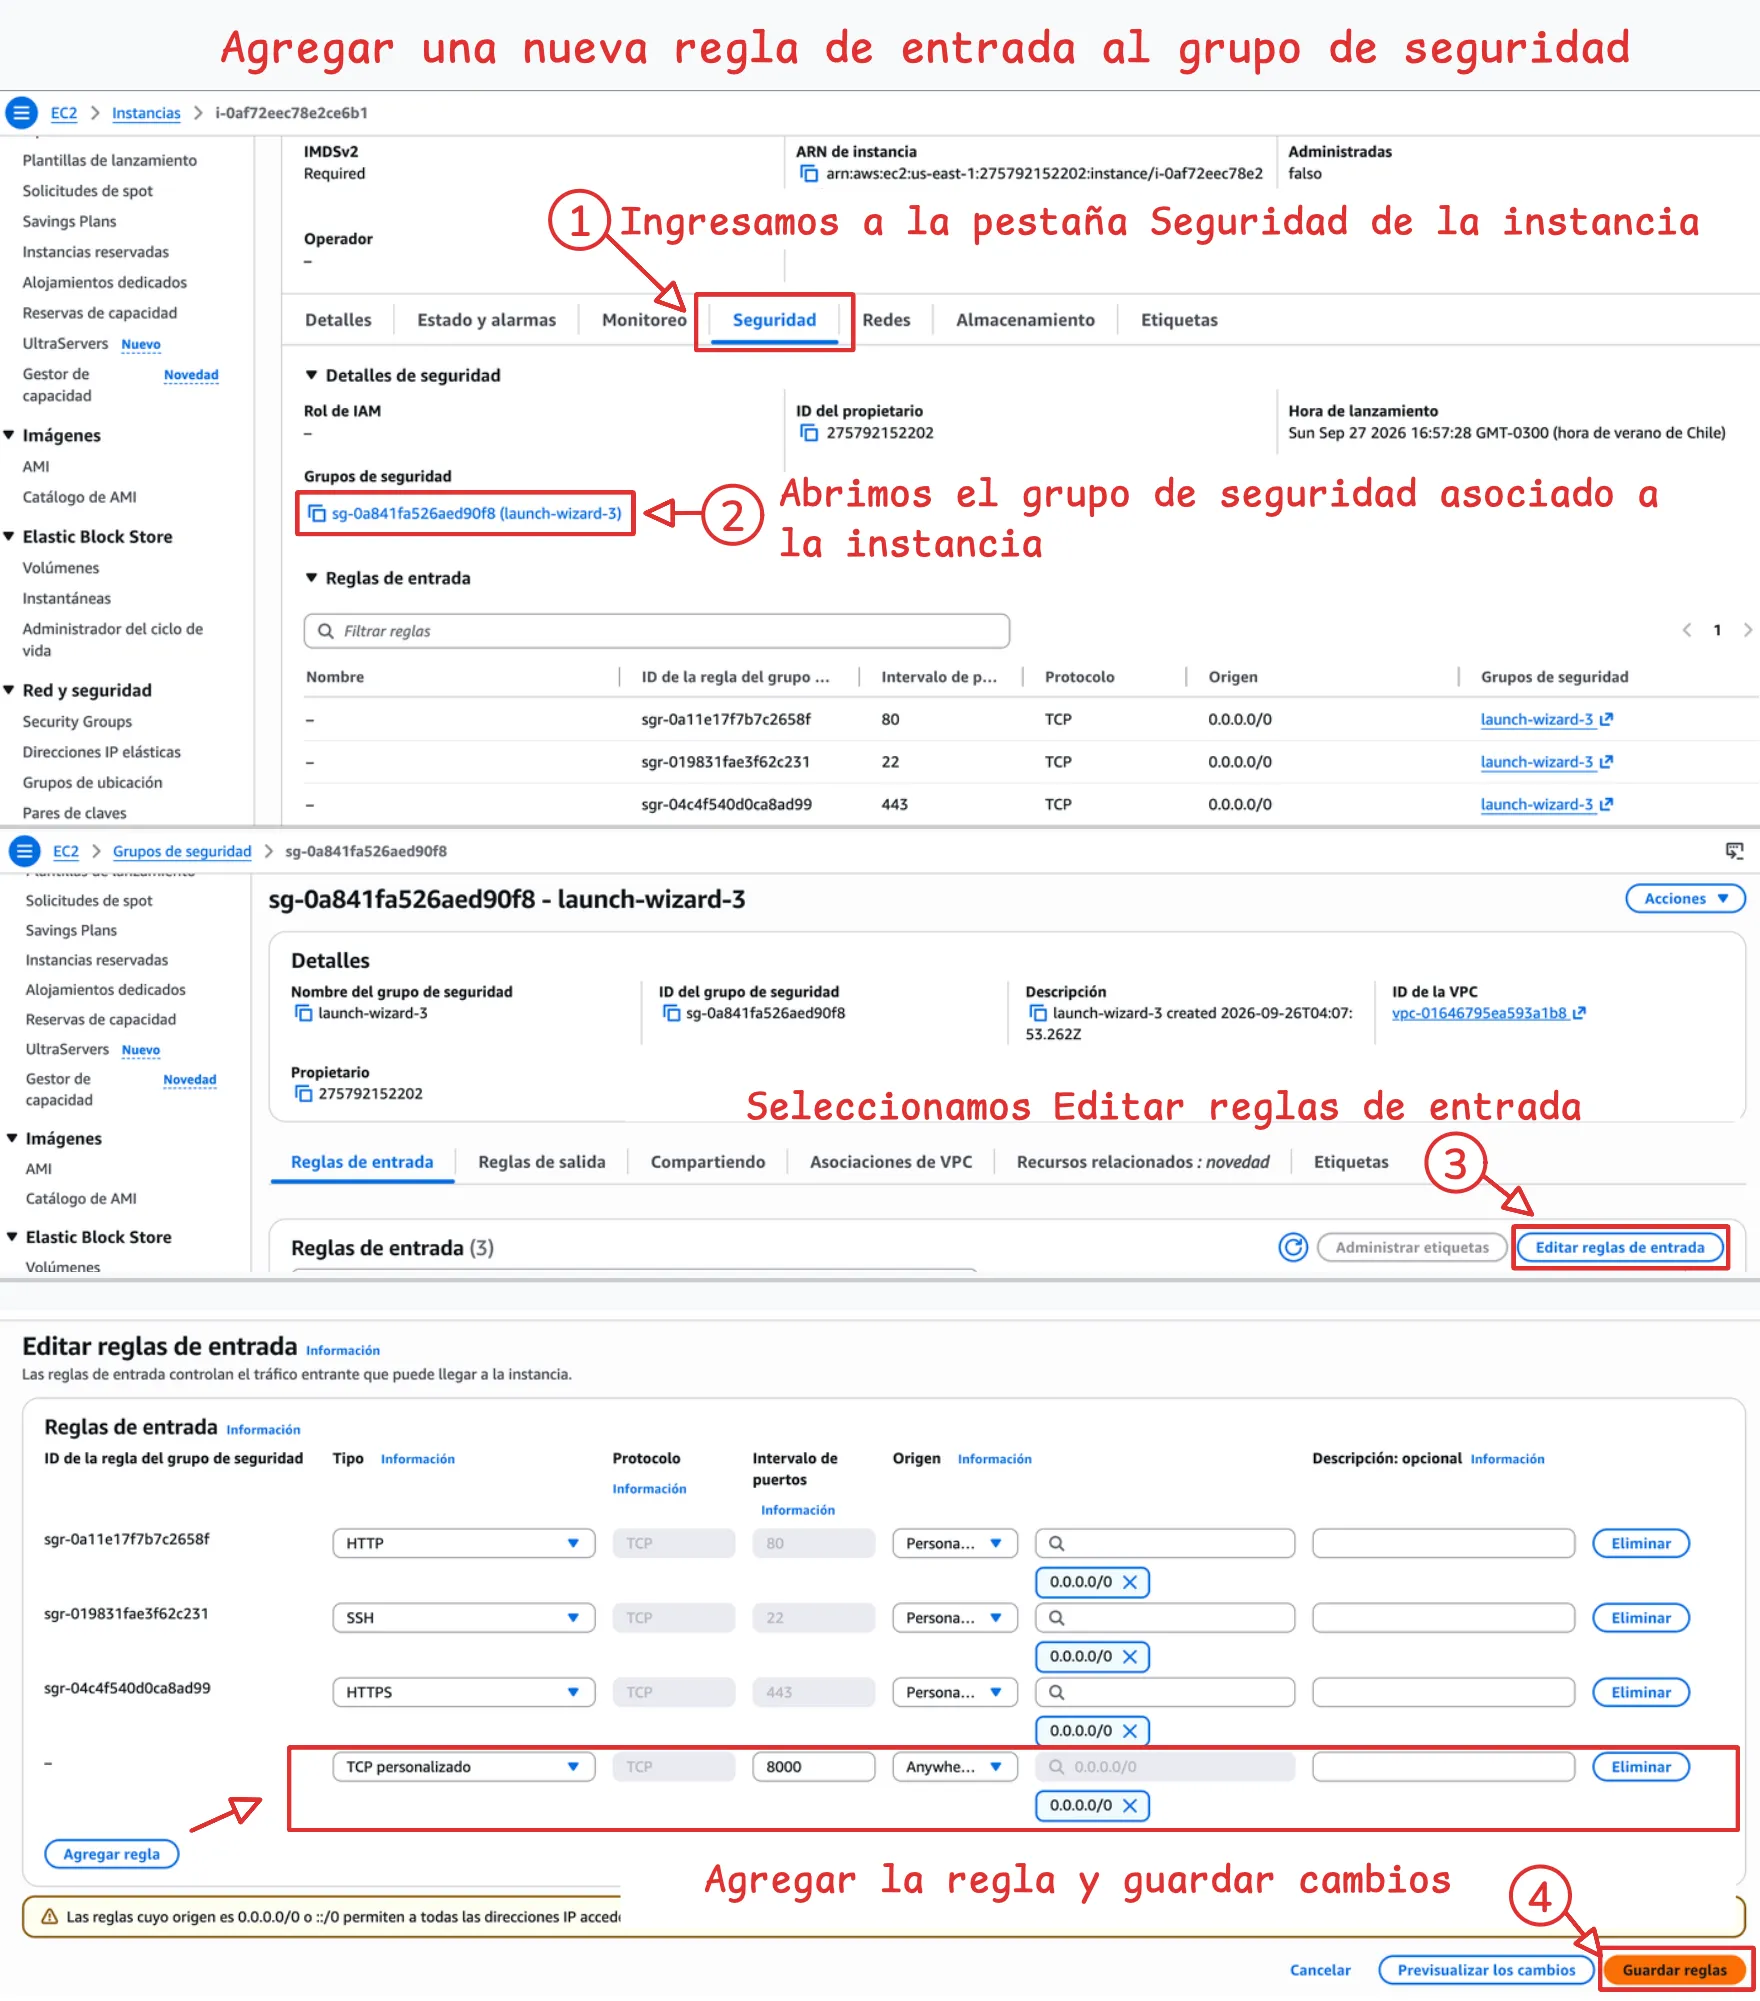
Figura 35. Agregar nueva regla de entrada en el Grupo de Seguridad asociado a la instancia
Para realizar una prueba de funcionamiento, ejecutamos temporalmente el servidor de desarrollo con runserver:
python manage.py runserver 0.0.0.0:8000
(.venv) ubuntu@ip-172-31-4-218:/var/www/proyecto-sgr-delegaciones$ python manage.py runserver 0.0.0.0:8000
Watching for file changes with StatReloader
Performing system checks...

System check identified no issues (0 silenced).
September 27, 2026 - 18:49:21
Django version 6.1.1, using settings '_site.settings'
Starting WSGI development server at http://0.0.0.0:8000/
Quit the server with CONTROL-C.

WARNING: This is a development server. Do not use it in a production setting. Use a production WSGI or ASGI server instead.
For more information on production servers see: https://docs.djangoproject.com/en/6.1/howto/deployment/
[27/Sep/2026 18:49:34] "GET / HTTP/1.1" 302 0
[27/Sep/2026 18:49:35] "GET /accounts/login/?next=/ HTTP/1.1" 200 2652
[27/Sep/2026 18:49:35] "GET /static/css/variables.css HTTP/1.1" 200 166
[27/Sep/2026 18:49:35] "GET /static/css/login.css HTTP/1.1" 200 5600
[27/Sep/2026 18:49:35] "GET /static/js/forms.js HTTP/1.1" 200 1332
[27/Sep/2026 18:49:35] "GET /static/css/libs/fa.7.3.1.all.min.css HTTP/1.1" 200 90336
[27/Sep/2026 18:49:35] "GET /static/img/left-bg.webp HTTP/1.1" 200 40816
[27/Sep/2026 18:49:36] "GET /static/css/webfonts/fa-solid-900.woff2 HTTP/1.1" 200 119488
Luego, accedemos desde el navegador a la IP pública de la instancia usando http. Por ejemplo: http://3.230.65.250:8000/
De esta forma, comprobamos que la aplicación funciona correctamente antes de continuar con la configuración de Gunicorn y Nginx.
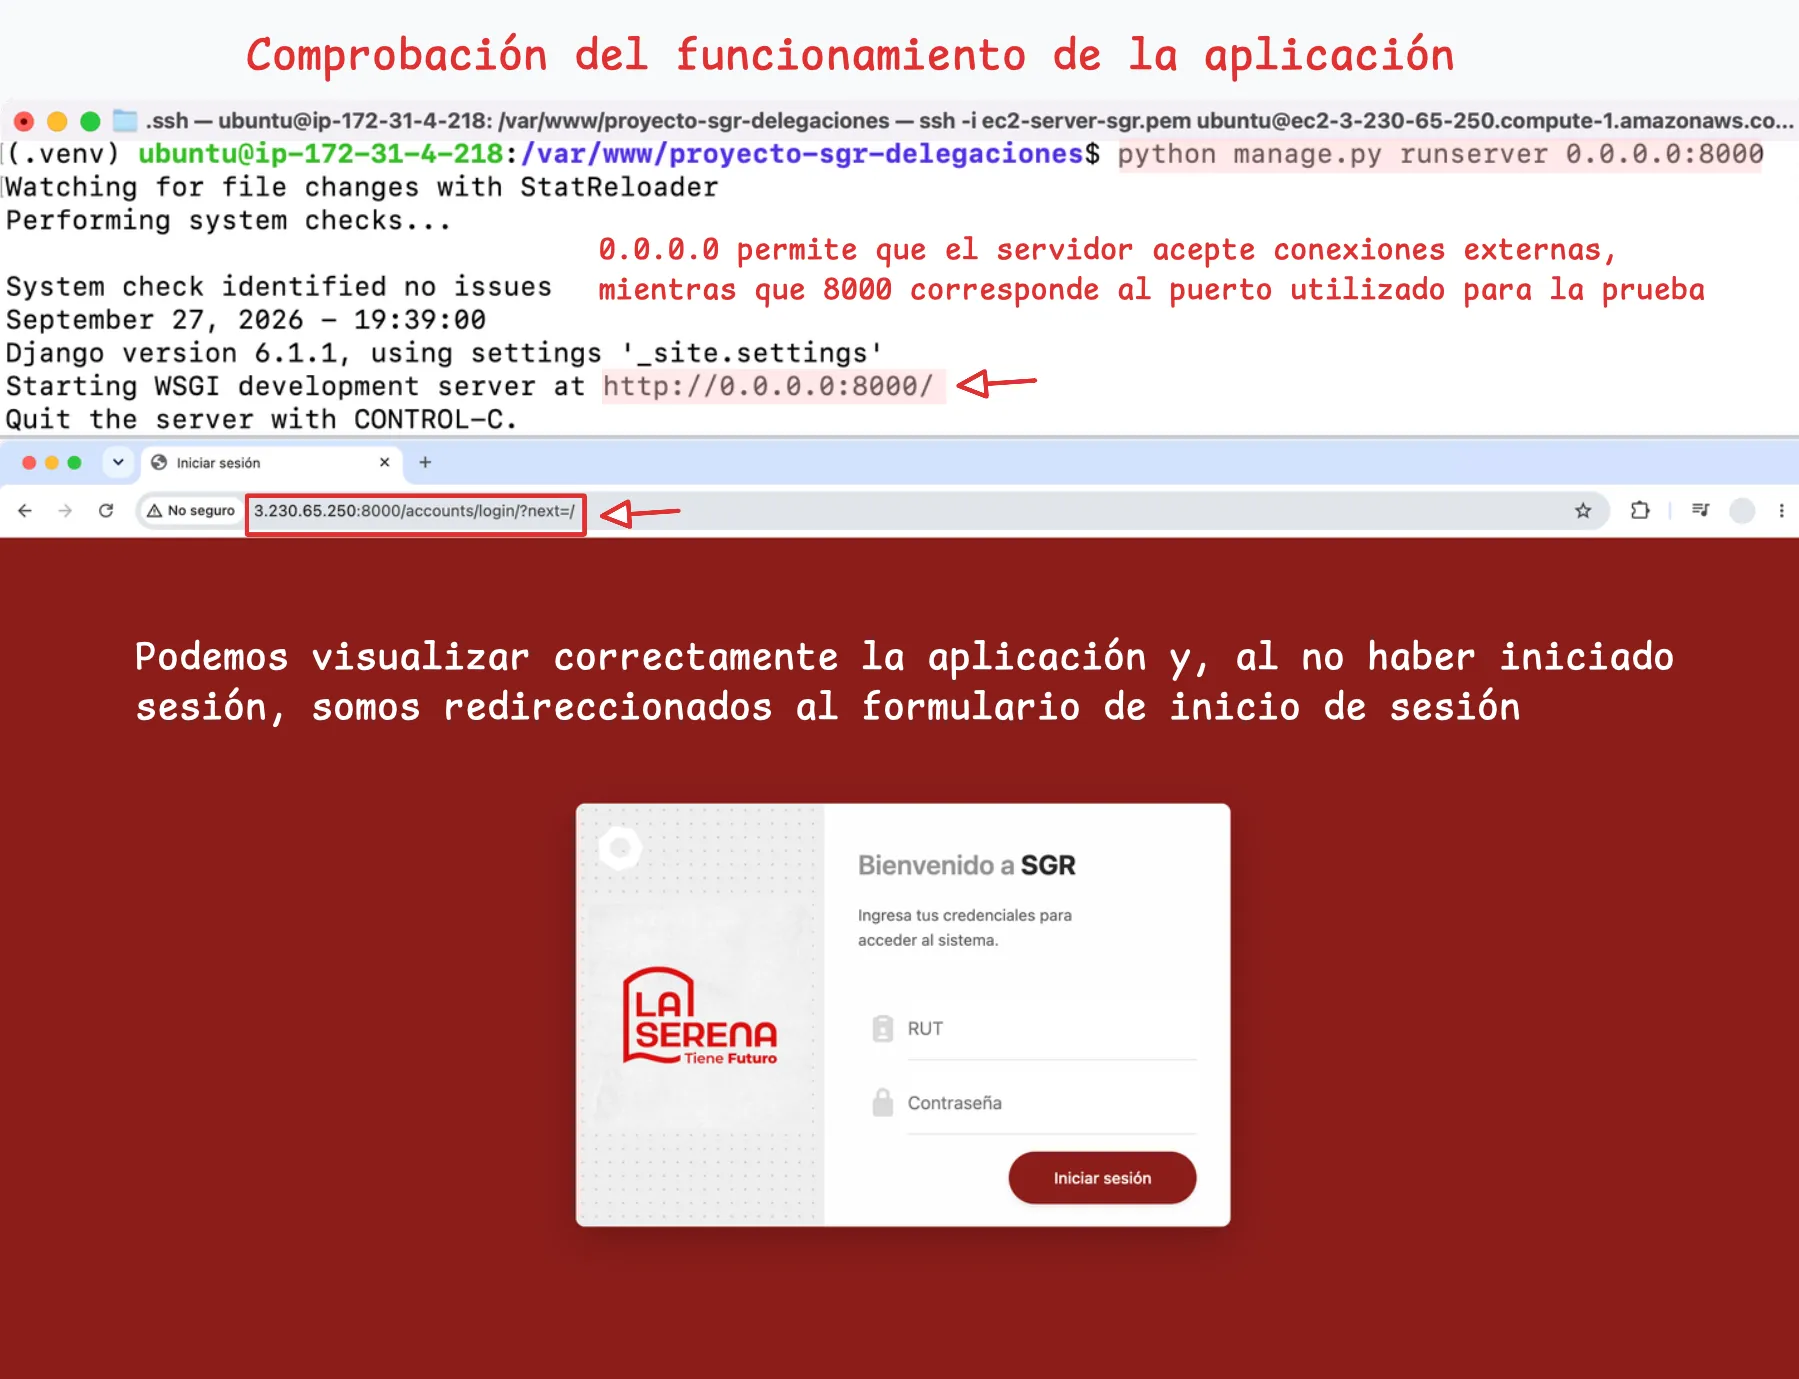
Figura 36. Comprobación de funcionamiento de la aplicación
18. Configurar Gunicorn como Servicio Systemd
Configuramos Gunicorn como servidor de aplicaciones para ejecutar el proyecto Django en el servidor.
A diferencia del servidor de desarrollo que ejecutamos con runserver, Gunicorn es un servidor de aplicaciones, por lo que no se encarga de servir los archivos estáticos de la aplicación, aunque estos hayan sido generados mediante el comando python manage.py collectstatic.
Entonces, ejecutamos Gunicorn directamente para comprobar que pueda iniciar y atender las peticiones de Django:
gunicorn \
--bind 0.0.0.0:8000 \#(1)!
--access-logfile - \#(2)!
_site.wsgi:application#(3)!
- Dirección y puerto de escucha.
- Registra las peticiones HTTP.
- Indica la aplicación WSGI de Django; reemplaza
_sitepor el nombre del proyecto utilizado al ejecutardjango-admin startproject.
(.venv) ubuntu@ip-172-31-4-218:/var/www/proyecto-sgr-delegaciones$ gunicorn \
--bind 0.0.0.0:8000 \
--access-logfile - \
_site.wsgi:application
[2026-09-28 01:29:21 +0000] [2010] [INFO] Starting gunicorn 26.2.0
[2026-09-28 01:29:21 +0000] [2010] [INFO] Listening at: http://0.0.0.0:8000 (2010)
[2026-09-28 01:29:21 +0000] [2010] [INFO] Using worker: sync
[2026-09-28 01:29:21 +0000] [2011] [INFO] Booting worker with pid: 2011
[2026-09-28 01:29:21 +0000] [2010] [INFO] Control socket listening at /run/user/1000/gunicorn.ctl
179.60.64.130 - - [27/Sep/2026:22:29:30 -0300] "GET /accounts/login/?next=/ HTTP/1.1" 200 2652 "-" "Mozilla/5.0 (Macintosh; Intel Mac OS X 10_15_7) AppleWebKit/537.36 (KHTML, like Gecko) Chrome/152.0.0.0 Safari/537.36"
Not Found: /static/css/variables.css
179.60.64.130 - - [27/Sep/2026:22:29:30 -0300] "GET /static/css/variables.css HTTP/1.1" 404 3243 "http://3.230.65.250:8000/accounts/login/?next=/" "Mozilla/5.0 (Macintosh; Intel Mac OS X 10_15_7) AppleWebKit/537.36 (KHTML, like Gecko) Chrome/152.0.0.0 Safari/537.36"
Not Found: /static/css/libs/fa.7.3.1.all.min.css
179.60.64.130 - - [27/Sep/2026:22:29:30 -0300] "GET /static/css/libs/fa.7.3.1.all.min.css HTTP/1.1" 404 3279 "http://3.230.65.250:8000/accounts/login/?next=/" "Mozilla/5.0 (Macintosh; Intel Mac OS X 10_15_7) AppleWebKit/537.36 (KHTML, like Gecko) Chrome/152.0.0.0 Safari/537.36"
Not Found: /static/css/login.css
179.60.64.130 - - [27/Sep/2026:22:29:31 -0300] "GET /static/css/login.css HTTP/1.1" 404 3231 "http://3.230.65.250:8000/accounts/login/?next=/" "Mozilla/5.0 (Macintosh; Intel Mac OS X 10_15_7) AppleWebKit/537.36 (KHTML, like Gecko) Chrome/152.0.0.0 Safari/537.36"
Not Found: /static/js/forms.js
179.60.64.130 - - [27/Sep/2026:22:29:31 -0300] "GET /static/js/forms.js HTTP/1.1" 404 3225 "http://3.230.65.250:8000/accounts/login/?next=/" "Mozilla/5.0 (Macintosh; Intel Mac OS X 10_15_7) AppleWebKit/537.36 (KHTML, like Gecko) Chrome/152.0.0.0 Safari/537.36"
Not Found: /favicon.ico
179.60.64.130 - - [27/Sep/2026:22:29:31 -0300] "GET /favicon.ico HTTP/1.1" 404 3204 "http://3.230.65.250:8000/accounts/login/?next=/" "Mozilla/5.0 (Macintosh; Intel Mac OS X 10_15_7) AppleWebKit/537.36 (KHTML, like Gecko) Chrome/152.0.0.0 Safari/537.36"
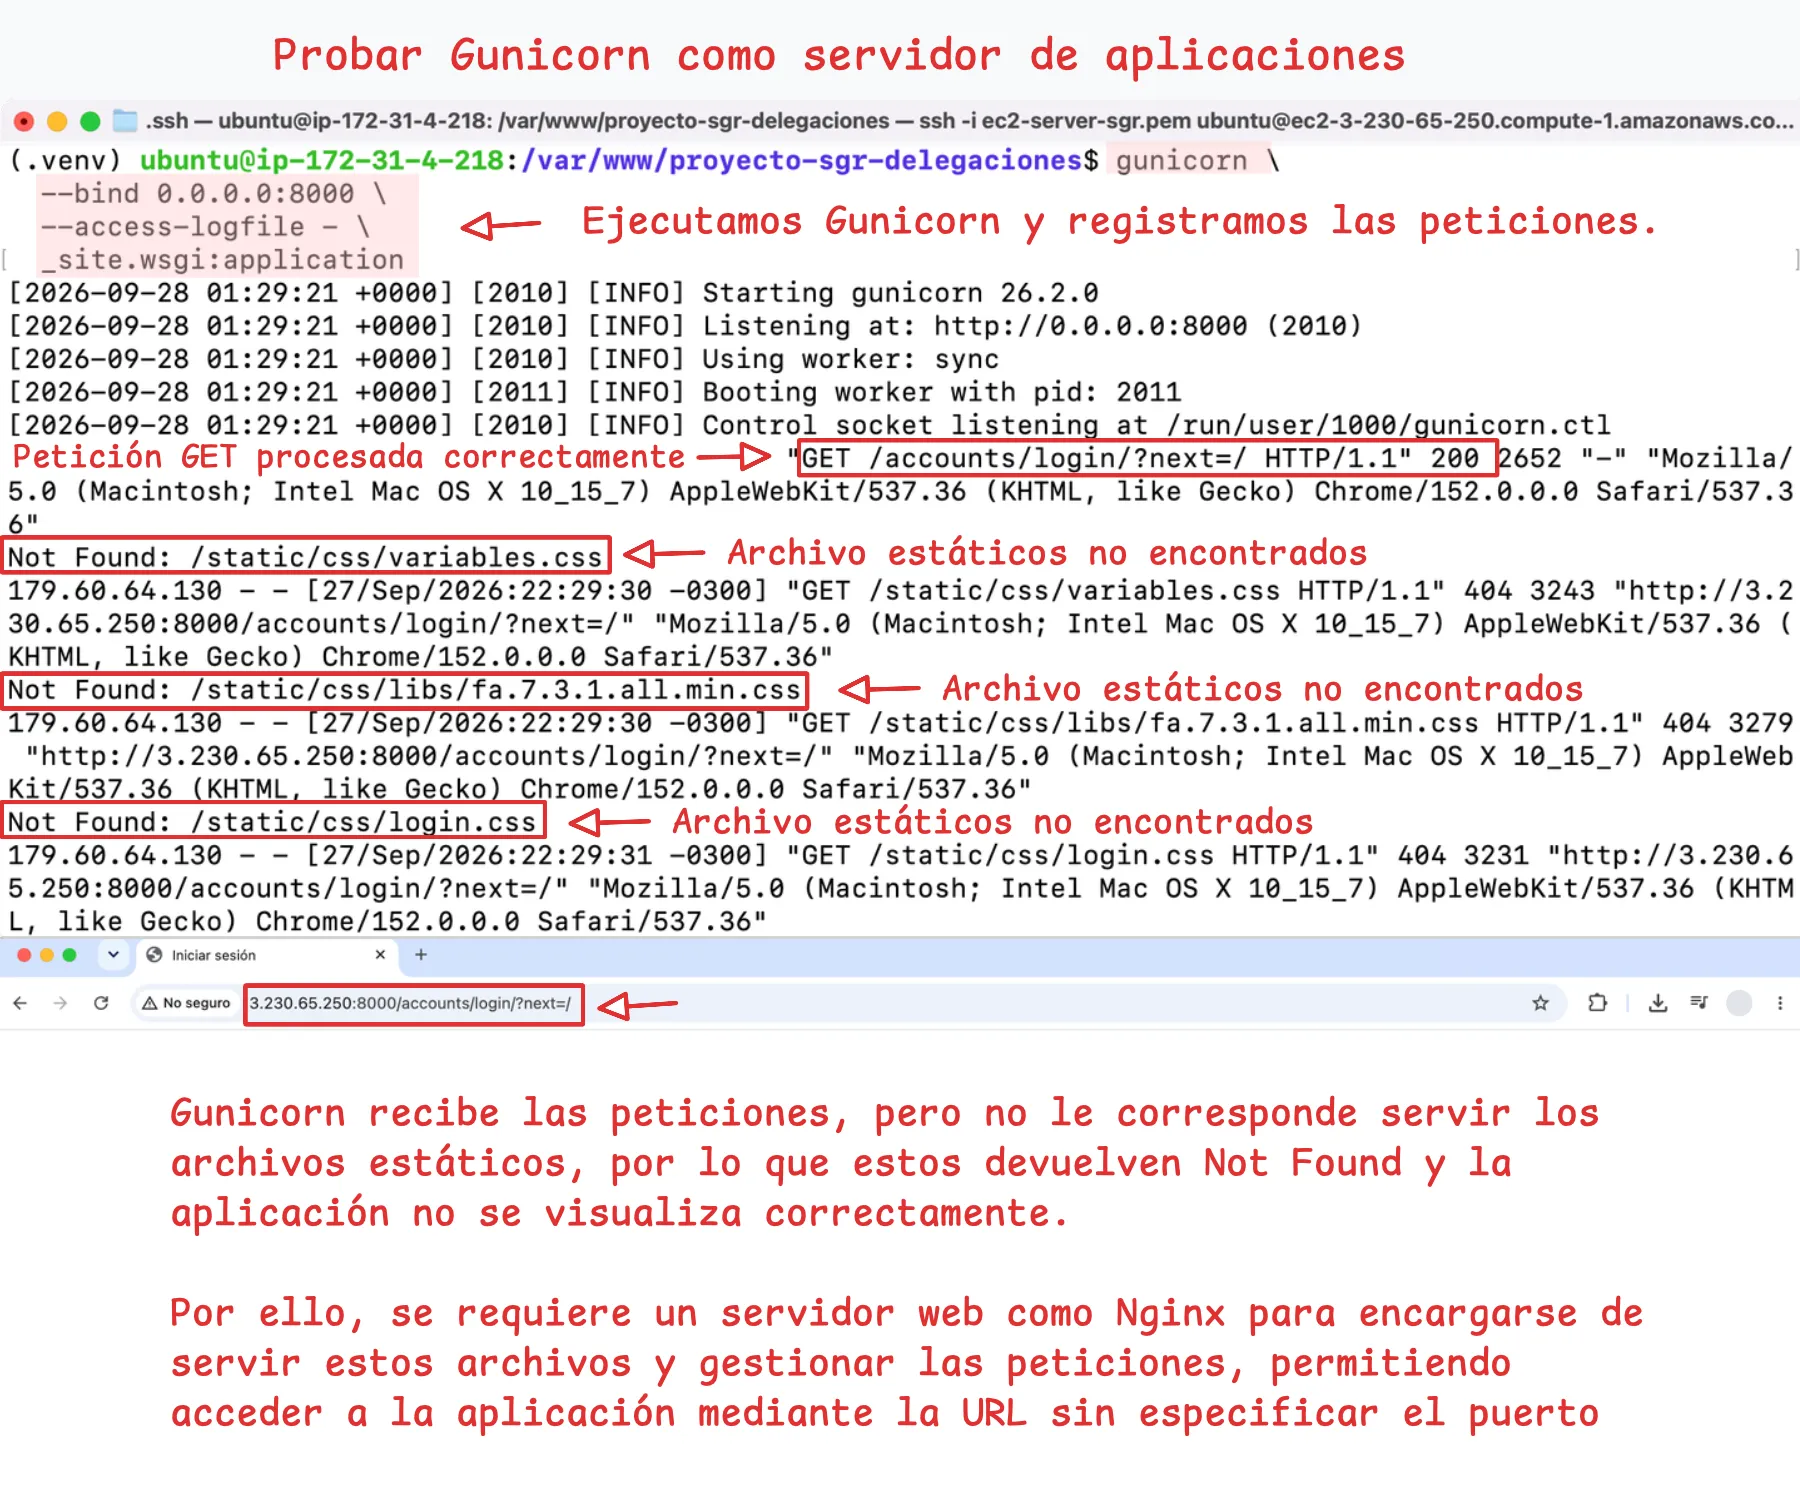
Figura 36. Probando Gunicorn como servidor de aplicaciones
Una vez probado Gunicorn, lo configuramos como un servicio para mantenerlo disponible de forma permanente. Esto es fundamental para que posteriormente Nginx pueda actuar como servidor proxy inverso, recibiendo las peticiones y derivándolas hacia Gunicorn.
Para entender mejor el contexto, el esquema de comunicación sería:
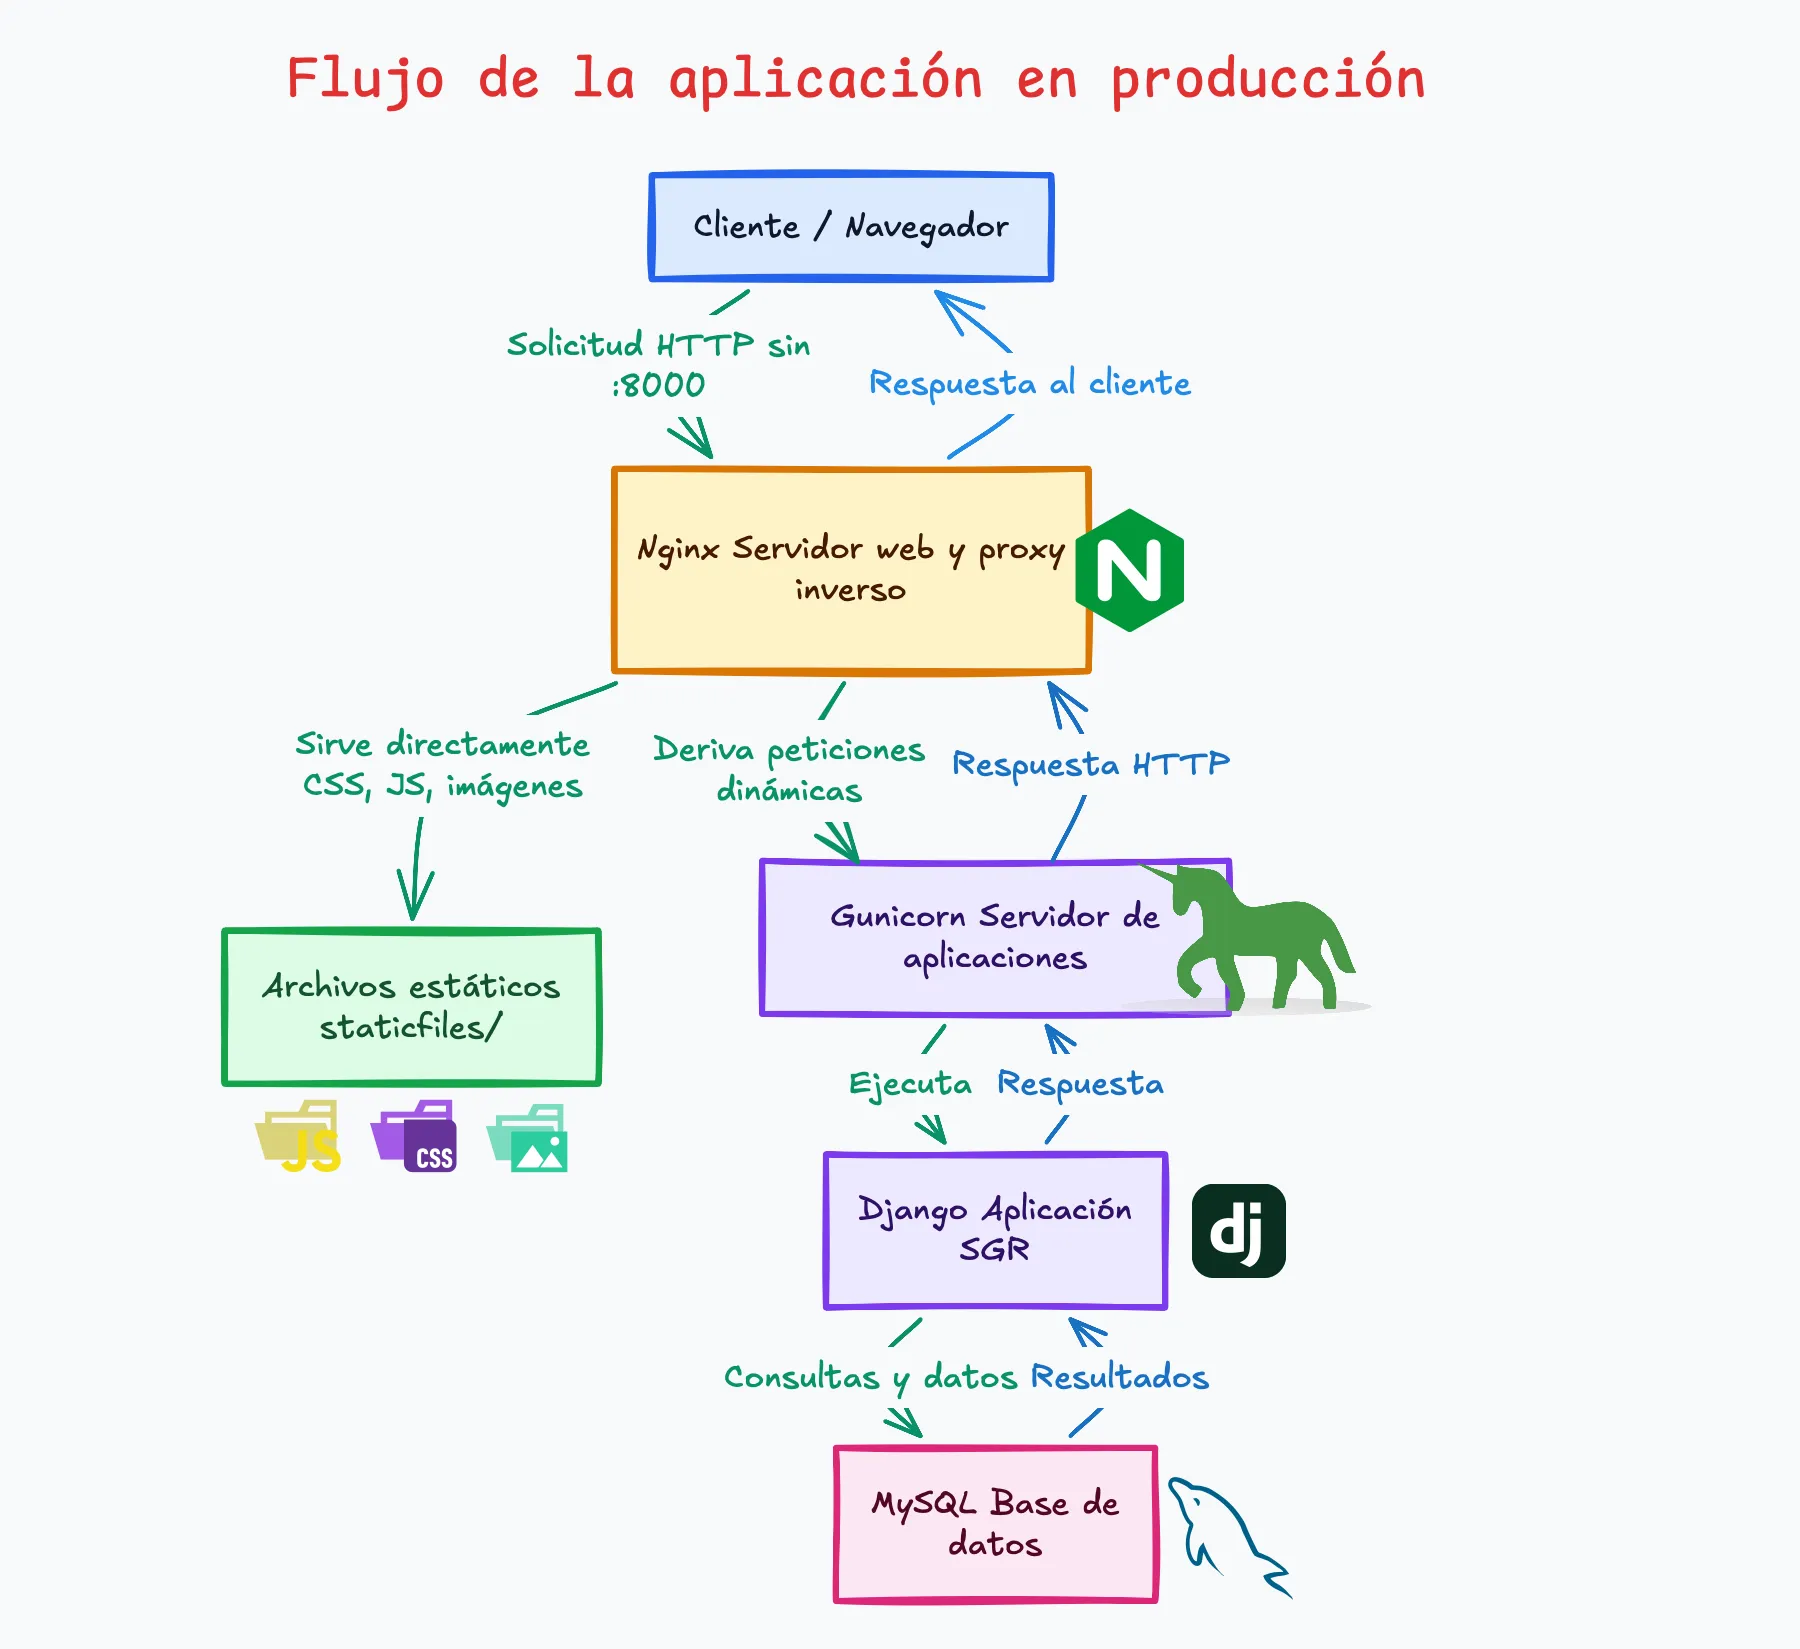
Figura 38. Flujo de comunicación entre Nginx, Gunicorn, Django y MySQL
Primero detenemos el Gunicorn que dejamos ejecutándose manualmente con Ctrl+C.
Luego creamos el archivo gunicorn.service para agregar la configuración:
sudo nano /etc/systemd/system/gunicorn.service
Reemplaza </ruta/a/tu/proyecto> y <tu_proyecto> con los valores reales.
| gunicorn.service | |
|---|---|
1 2 3 4 5 6 7 8 9 10 11 12 13 14 15 | |
After=network.target: Indica que systemd debe iniciar Gunicorn después de que la red del sistema haya sido levantada.User=ubuntu: Gunicorn se ejecuta como el usuario ubuntu (o el usuario que tenga tu ec2).Group=www-data: El proceso pertenece al grupowww-data. Esto facilita que Nginx pueda acceder al socket de GunicornWorkingDirectory=: Indica desde qué directorio se ejecutará Gunicorn. En nuestro caso es:/var/www/proyecto-sgr-delegaciones.ExecStart=Indica el comando que systemd debe ejecutar para iniciar Gunicorn. En nuestro caso es:/var/www/proyecto-sgr-delegaciones/.venv/bin/gunicorn.--workers 3: Indica que Gunicorn ejecutará 3 procesos workers para atender las solicitudes de tu aplicación Django.--bind unix: Indica dónde Gunicorn va a crear el socket Unix que permitirá que Nginx se comunique con Gunicorn.<tu_proyecto>.wsgi:application: Le dice a Gunicorn qué aplicación Django debe ejecutar. En nuestro caso el dirtectorio del proyecto es_site, por ende quedaría como_site.wsgi:applicationWantedBy=multi-user.target: Le indica a systemd que el servicio Gunicorn debe quedar asociado al arranque normal de un servidor Linux.
Luego, debemos recargar la configuración de systemd.
sudo systemctl daemon-reload
Esto permite que systemd reconozca el archivo gunicorn.service.
Ahora iniciamos y habilitamos el servicio de Gunicorn.
sudo systemctl start gunicorn
sudo systemctl enable gunicorn
Revisamos que se encuentra operativo.
sudo systemctl status gunicorn
ubuntu@ip-172-31-4-218:~$ sudo systemctl status gunicorn
● gunicorn.service - Gunicorn daemon for SGR
    Loaded: loaded (/etc/systemd/system/gunicorn.service; enabled; preset: enabled)
    Active: active (running) since Mon 2026-09-28 02:46:41 UTC; 51s ago
Invocation: 6dcd0e4ff21e4fa6ae2eec0b224a1b57
Main PID: 638 (gunicorn)
    Tasks: 5 (limit: 627)
    Memory: 122.1M (peak: 126.7M)
        CPU: 1.550s
    CGroup: /system.slice/gunicorn.service
            ├─638 /var/www/proyecto-sgr-delegaciones/.venv/bin/python3 /var/www/proyecto-sgr-delegaciones/>
            ├─852 /var/www/proyecto-sgr-delegaciones/.venv/bin/python3 /var/www/proyecto-sgr-delegaciones/>
            ├─865 /var/www/proyecto-sgr-delegaciones/.venv/bin/python3 /var/www/proyecto-sgr-delegaciones/>
            └─879 /var/www/proyecto-sgr-delegaciones/.venv/bin/python3 /var/www/proyecto-sgr-delegaciones/>
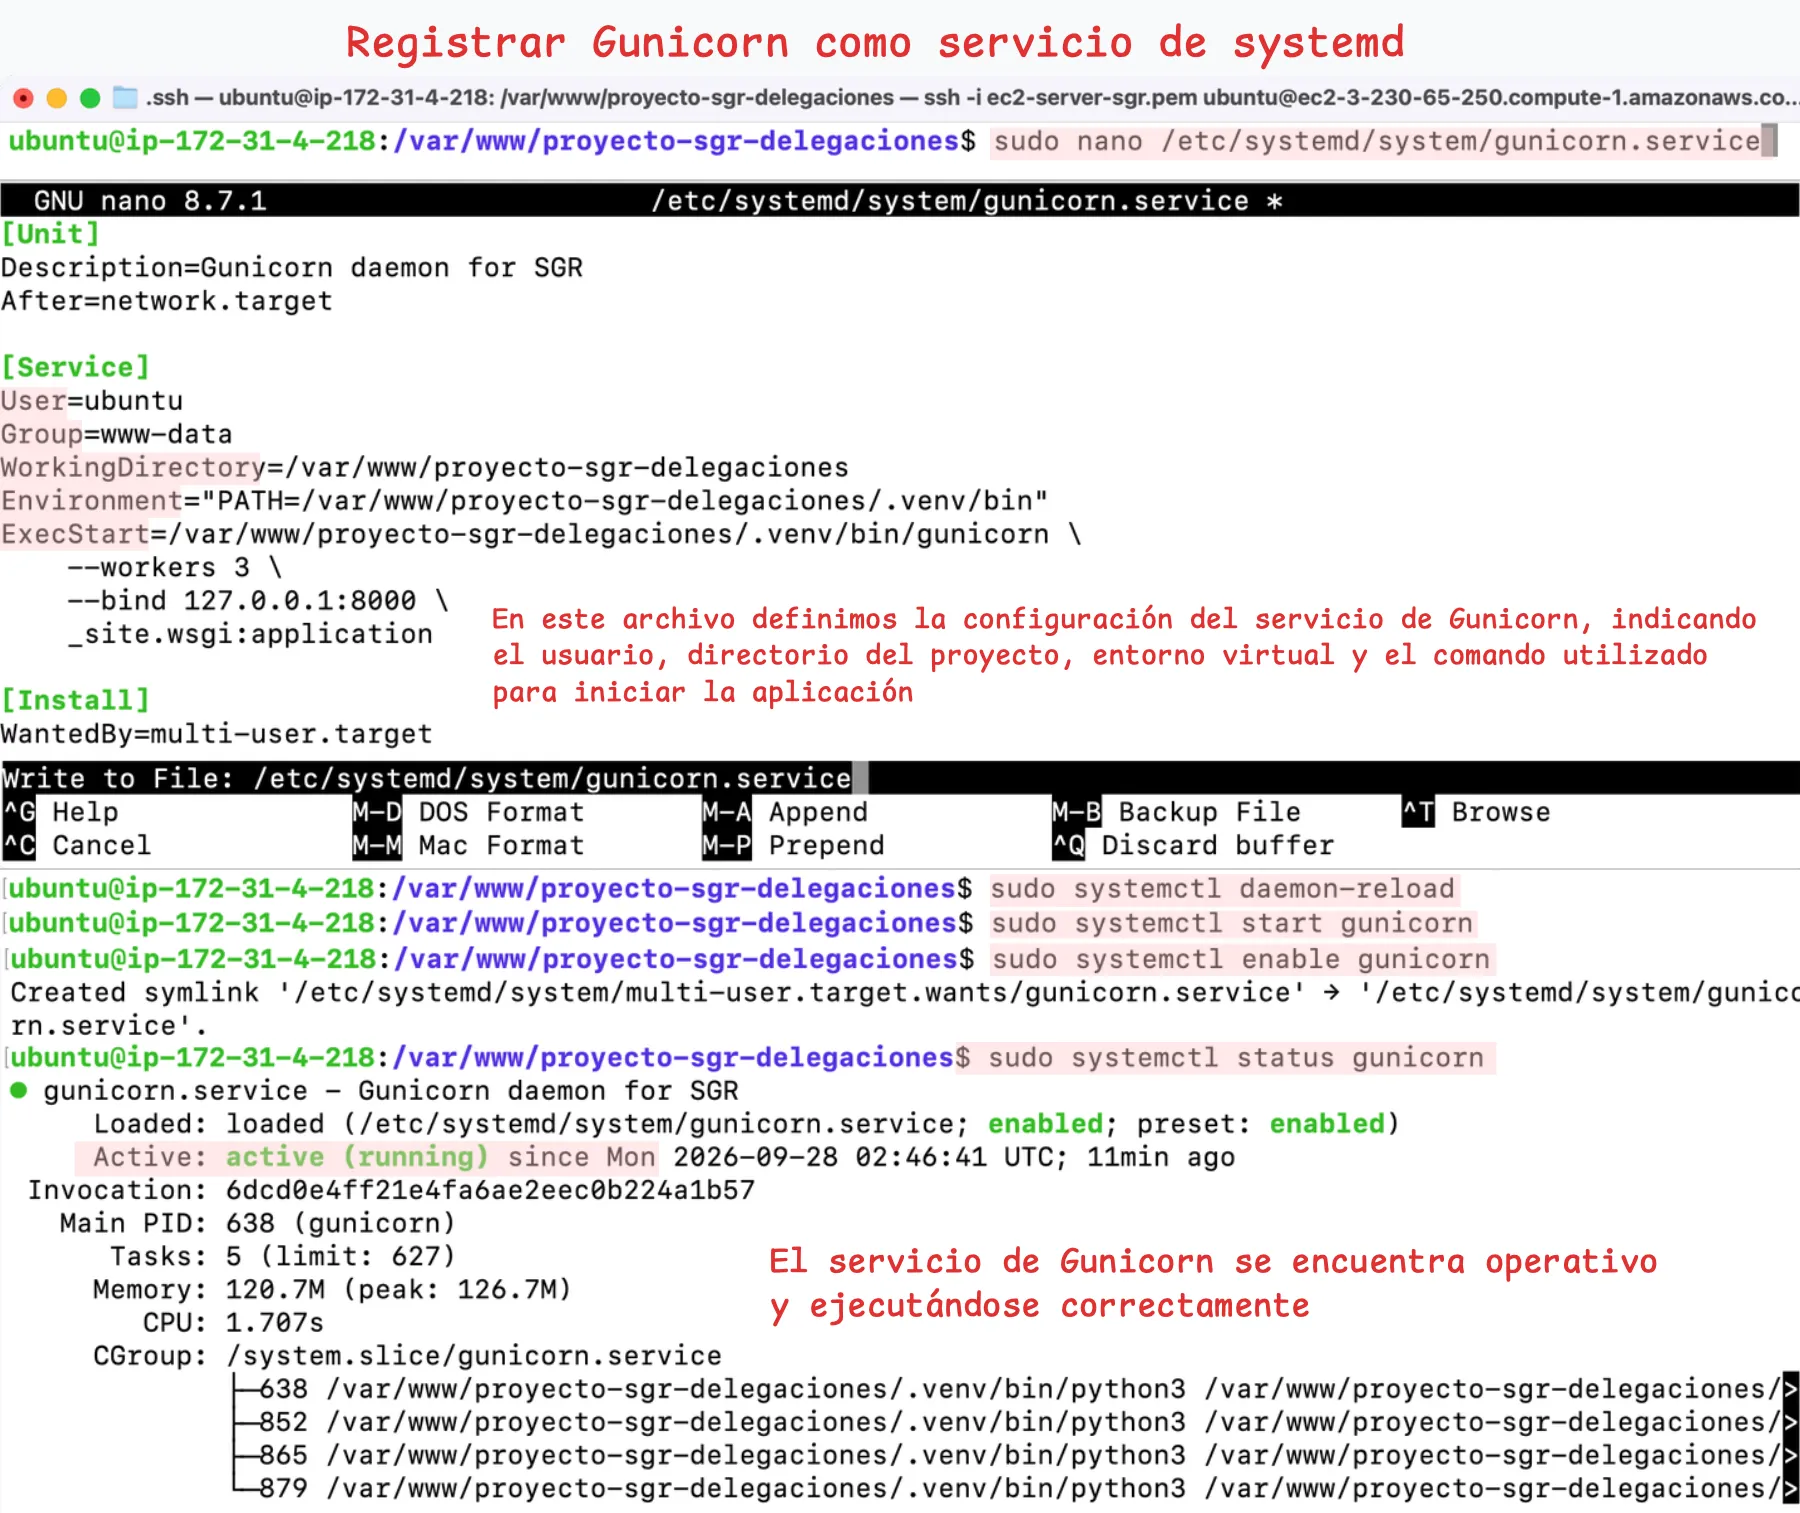
Figura 39. Configurando Gunicorn como servicio
19. Configurar NGINX como proxy inverso
Una vez configurado Gunicorn como servicio, continuamos con la configuración de NGINX como proxy inverso. Este se encargará de recibir las solicitudes del cliente, servir los archivos estáticos y derivar las peticiones dinámicas hacia Gunicorn.
Primero instalamos NGINX en la instancia:
sudo apt install nginx -y
Después verificamos que el servicio se encuentre operativo y lo habilitamos.
sudo systemctl status nginx
sudo systemctl enable nginx
Creamos un archivo de configuración de Nginx para el sitio.
sudo nano /etc/nginx/sites-available/django
Ahora el siguiente bloque remplazando </ruta/a/tu/proyecto/> por los valores para el proyecto.
| /etc/nginx/sites-available/django | |
|---|---|
1 2 3 4 5 6 7 8 9 10 11 12 13 14 15 16 17 18 19 20 21 | |
Ahora, se habilita el sitio y reinicia NGINX.
sudo ln -s /etc/nginx/sites-available/django /etc/nginx/sites-enabled/
sudo nginx -t
sudo systemctl restart nginx
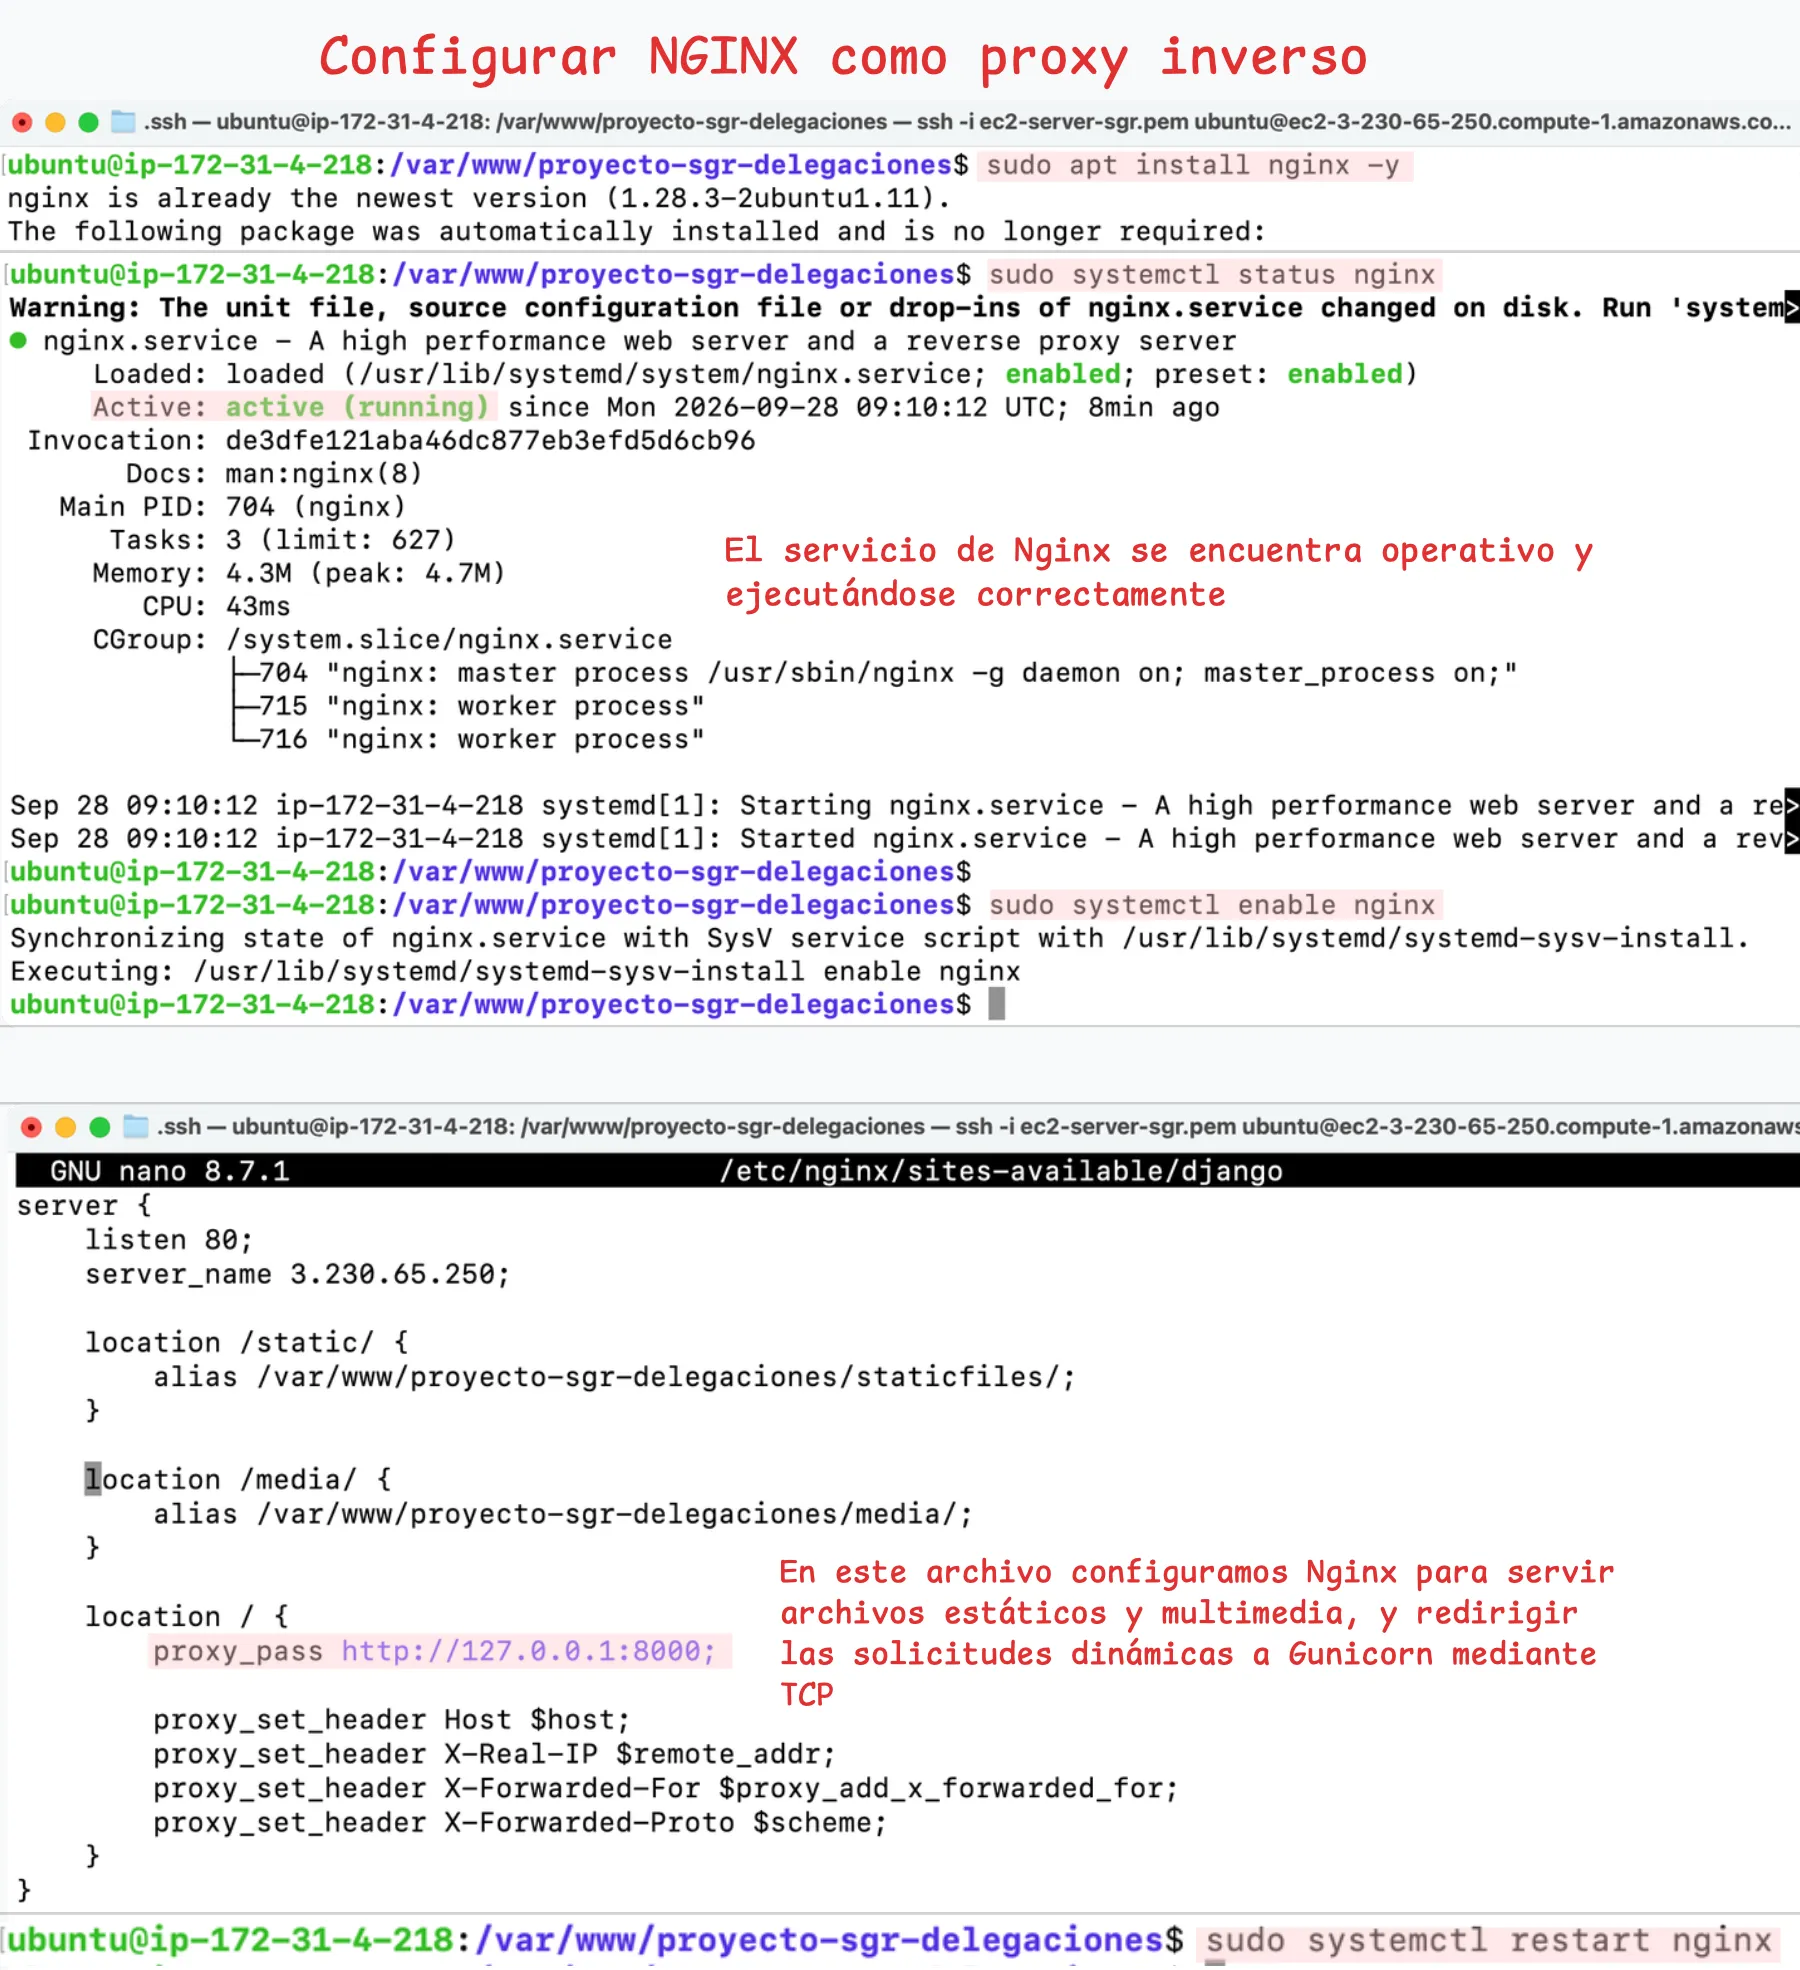
Figura 40. Configurando Nginx como proxy inverso
Finalmente, podemos comprobar que la aplicación se encuentra operativa desde la IP pública.
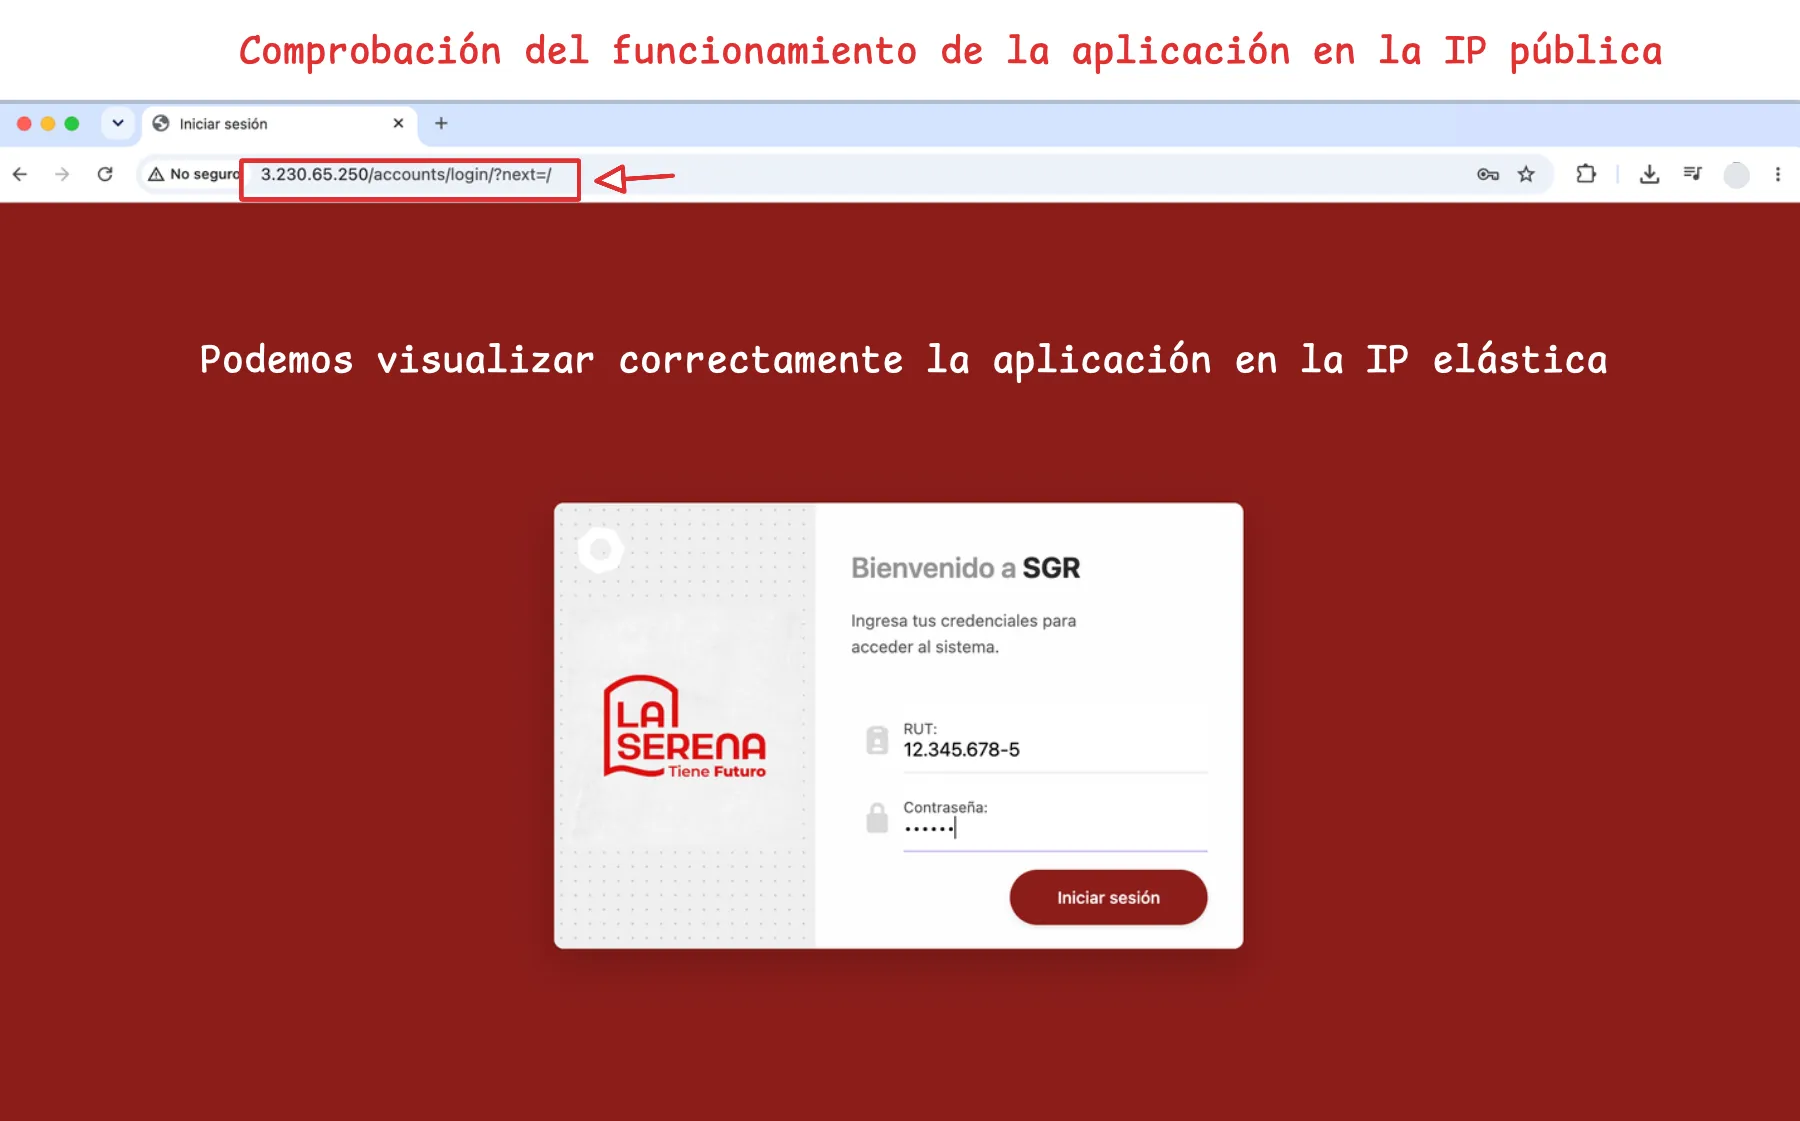
Figura 41. Aplicación operativa en la IP pública